
How to configure Docker with two containers: Frontend and Backend
Posted on: 2022-04-26
In this article, I explain how to configure Docker to have two independent services (server):
- One service hosts the static files from a SolidJS framework (same apply to React)
- One service operates a NodeJS server that hosts a basic REST service (could be used for any backend service)
The article focus on:
- Development and Production environment
- The development environment should be as quick as possible for the dev. It means no need to build the container every time
- The development environment must isolate the service (server) and be configurable. It means the developer must decide which port each service operate
- The production containers are not bound to the developer machine; all the files are in the Docker container.
- The production server for the frontend can use NGINX to host the static files instead of Node
Here is a sketch of the frontend service with at the top the dev environment and the bottom the production environment.
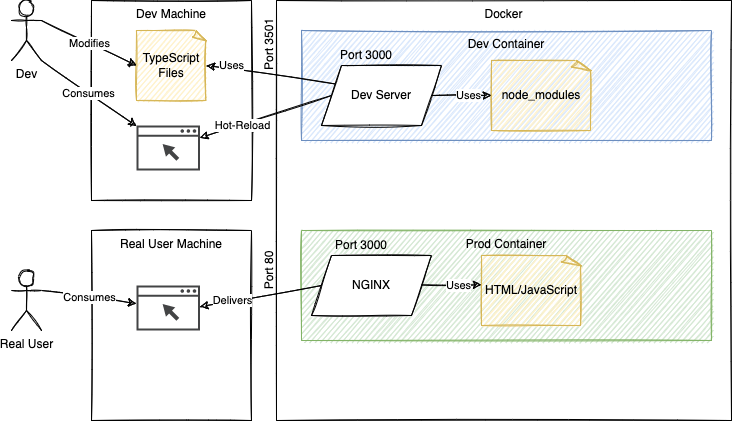
If these specifications fit your need, then you are in luck! In my perspective, these requirements are pretty standard. For example, when developing, we want TypeScript to transpile the code, and we want to see the change directly. Using React or SolidJS and Docker, we can save the TypeScript file and see the result on your browser within a few seconds (<2 seconds). Similarly, when working on the NodeJS server, adding HTTP endpoints or modifying the logic is a matter of saving the file; the developer server running in the Docker's container will see the change and be rebooted automatically. On the opposite, when it's time to publish the production code, everything should be isolated inside the Docker container. Hence, we have a specific Docker configuration to manage that case.
Prerequisite
It is without saying that you need to have Docker installed on your developer machine. You should also already know a little bit about how Node and NPM work.
Dockerfile
You will need two Dockerfile files, one per service, not one per environment. The importance of having two Dockerfile might be confusing at first, but it is the case only because I am making two services into a single repository in this article. Hence, if you have one repository for one service, you would have one Dockerfile.
In short, you need one Dockerfile per micro-service. However, you might be constrained to have everything in a single repository in many cases. A single place is quite convenient to share code, and it is less moving for small and medium applications. So, in this project, let's have the mindset that we have a single repository with two services.
Project
  |
  ---> services
        |
        ----> backend
                |
                ----> Dockerfile
        ----> frontend
                |
                ----> Dockerfile
docker-compose.yml
The next critical part is the docker-compose.yml file. The compose file is the glue between all our services. From the compose file, we will instruct what to pass down to the Dockerfile. It is a convenient place to build all services for a specific environment with one command and start all of them simultaneously. The file location is at the project's root, sibling to the services folder.
.env
At the project's root, we will have an environment file .env. That is a great place to see all configurations. Also, a great place to configure all the environment in one place and then have the rest of all systems, from Docker, NGINX, Vite, and NodeJS, to hydrate from it. For the two services and containers, we need these IP and PORT:
NODE_ENV=development

CLIENT_IP=127.0.0.1
CLIENT_PORT=3000
DOCKER_CLIENT_PORT_FORWARD=3501

SERVER_IP=127.0.0.1
SERVER_PORT=80
DOCKER_SERVER_PORT_FORWARD=3500
Three blocks of variables. The first one will switch between development and production. The second block is all the frontend variables. The third block is all the backend variables. The CLIENT_PORT and SERVER_PORT are the ones used by the service in the container. The DOCKER_CLIENT_PORT_FORWARD and DOCKER_SERVER_PORT_FORWARD are the ones exposed to any consumer of the services outside the container. Hence, you can think about it so that on your computer, you will connect to the port DOCKER_CLIENT_PORT_FORWARD, which Docker will understand and redirect to the service inside its container, the port CLIENT_PORT. SolidJS and React CRA are both using port 3000 for its hot-reloaded dev server. Hence it is natural to set it to 3000. I configured in this file 80 for the server because NodeJS and NGINX are both by default at port 80. However, you can change the value and have these tools operate inside your container to another port. What is remarkable is that you can expose to your computer many web servers to many different ports without worrying about having more than one service running on the same port.
Configuring the Frontend Application in Development
Let's start with the frontend application. We won't code the frontend other than start the init command on the SolidJS. Similar to the CRA of React, it creates an index page and two commands: one to run when you develop that has a small server and a build command that generate the Javascript. Thus, inside the frontend folder, you can run:
npx degit solidjs/templates/ts .
You will have a package.json and a tsconfig.json.
Now, Docker configuration file. Create a Dockerfile that does not have an extension and we will create two sections. Each section represents a stage. In Docker, a stage allows dividing a Docker container into a separate block. Hence, we can have a development stage and a production stage. The power of staging is that a stage can use previously executed stage output. But we won't use that power here. We will keep it simple. Instead, we are using a stage to indicate which piece of code to execute during the build process.
# ---------------------------------------
# Development stage
# ---------------------------------------
FROM node:16 AS development
WORKDIR /node
COPY package*.json tsconfig.json ./
ARG NODE_ENV=development
ENV NODE_ENV=${NODE_ENV}
RUN npm install
WORKDIR /node/app
CMD ["npm", "run", "start:development"]
These are all the configurations required for the frontend (SolidJS) to be hot-reloaded enabled with the node_modules inside the container. First, let's break down the instructions.
FROM node:16 AS development
Docker's containers are built upon other containers. In that configuration, the container is built on top of the node container that hosts a NodeJS version 16. That is convenient because it contains NodeJS and NPM. Hence, no need to install and configure anything around these two tools. Next, the AS development is how we label the stage. It is essential to name it properly because inside the docker-compose.yaml, we will specify which stage to call. While not required, it is excellent to have a stage with the same environment variable name that you will use for your environment. In my case, I plan to have the NODE_ENV to be development or production.
WORKDIR /node
Docker will create a node folder and will set it as the active directory. Later, if you debug your container, you can connect to it and examine its filesystems. You will see a node folder.
COPY package*.json tsconfig.json ./
Inside the /node folder, we will copy from your computer (first parameter) to Docker's container filesystem (second parameter). In that case, we are copying the file package.json (and lock file) and tsconfig.json. We are not copying every file yet. Also, files from your computer are copied from the root directory determined by the location of the Dockerfile. In that case, the files from services/frontend/. The reason that we are copying only these two files are that at the next step, we will install the packages. For efficiency, Docker caches each command in the Dockerfile. Installing all the NPM packages is costly and only required if the package.json file is changing. Thus, we create an atomic cachable step here. Since we won't copy all the files for the current stage, it does not matter. We do not copy all the files because we will mount Docker to your developer machine. If you modify a file locally and save that, you do not need to stop the Docker container, build the Docker container and start it again. Instead, the Docker container that has the packages and is running the development server remains active in the container, and this one connects to your machine.
ARG NODE_ENV=development
ENV NODE_ENV=${NODE_ENV}
These two lines mean that we will receive a NODE_ENV from docker-compose, to set the value to the environment variable. If we do not specify these lines, the NODE_ENV will be taken from the system environment variable (or .env), which is acceptable in some situations. Still, here, we want to push the value to the environment variable, and then all subsequent commands will have the value desired at build time.
So far, everything is cached, and if you rebuild the Docker container without any change of which file to copy or without changing the version of Node, everything will be super fast. The next step also will be cached. The first time will be slow, then super fast:
RUN npm install
The following line is WORKDIR /node/app, and it is a hack to work around the mounting of the source file. The hack is to move the current directory once level higher than the project in the app folder. It does not make full of sense now, but we will mount in the docker-compose the developer services/frontend to this node/app folder. It allows the developer to run NPM install on the dev machine. If done, the code will use it; otherwise, it will go to the parent folder to use the node_modules from the container. It is a way to work regardless if performed or not. Because we use TypeScript, we need the types, and we expect the developer to run NPM install, so that will work.
CMD ["npm", "run", "start:development"]
The last instruction is what needs to be executed when the Docker's container is starting. I created a start:development but we could have kept the start. The idea behind having the command having the environment variable string is that we might (not in this article) be able to swap between environments dynamically using the NODE_ENV.
That's it for the development docker for the frontend.
Configuring the Frontend Application in Production
The production environment is similar but different. We will rely on the source code in the services/frontend and different because we are not connecting to the developer machine for the source code; we want to have everything contained in the container. Also different because we will host the generated static files from SolidJS (which would be the same for React) using an Nginx server. Nginx is performant to host static files, and it is an excellent exercise to see how to create a Docker container from a different image.
In the same file that we worked on previously for the frontend development, we are adding the following code.
# ---------------------------------------
# Production stage
# ---------------------------------------
FROM nginx:1.21.6 AS production

ARG NODE_ENV=production
ENV NODE_ENV=${NODE_ENV}

RUN apt-get update && apt-get install -y \
    software-properties-common \
    npm
RUN npm install npm@latest -g && \
    npm install n -g && \
    n 16

WORKDIR /node
COPY package*.json tsconfig.json ./
RUN npm install --include=dev

COPY . .
RUN npm run build

RUN rm -rf /usr/share/nginx/html/*
RUN mv dist/* /usr/share/nginx/html
COPY nginx.conf /etc/nginx/conf.d/default.conf

ENTRYPOINT ["nginx", "-g", "daemon off;"]
The first line base the production stage on the Nginx image instead of node. It means that we need to intall npm and node to build the project into this container.
RUN apt-get update && apt-get install -y \
    software-properties-common \
    npm
RUN npm install npm@latest -g && \
    npm install n -g && \
    n 16
You can observe that it is not straightforward and some Internet research is required to install Node 16 compared to the previous configuration which was simply FROM node:16. Nonetheless, now we have NGINX and Node installed into the container.
WORKDIR /node
COPY package*.json tsconfig.json ./
RUN npm install --include=dev
Like previously, we need to build the dependencies. However, there is a catch! We are under NODE_ENV of production, meaning that running NPM install does not install the devDependencies. Thus, we must specify the --include=dev, which is a must since the SolidJS and Vite are under the devDependencies.
Then, we copy all the TypeScript files, HTML, and CSS files.
COPY . .
RUN npm run build
Again, we do it after the copy of the package.json because if we rebuild the container for production without changing the package.json file, the installation will be cached and run under 1 second instead of many seconds (or minutes when the project grows).
RUN rm -rf /usr/share/nginx/html/*
RUN mv dist/* /usr/share/nginx/html
COPY nginx.conf /etc/nginx/conf.d/default.conf
The next block of instruction removes the default HTML file that Nginx installs by default, then we move our NGINX configuration file into the NGINX folder. We have a nginx.conf in the services/frontend to give us some flexibility on the NGINX server. For example, we are able to change the port in the file.
ENTRYPOINT ["nginx", "-g", "daemon off;"]
Finally, the ENTRYPOINT is similar to the CMD, it tells what to perform when the container starts. It is not executed at build time. The main difference compared to CMD is that the value specified to ENTRYPOINT cannot be overriden. It means that if you run the DOCKER run that anything after run would go after the CMD command allowing you to be flexible. With ENTRYPOINT nothing passed by the CMD is appended to the command. You might ask why I am not using ENTRYPOINT in both stages (development and production), and that is a valid observation: I could. But to illustrate both syntaxes, let's keep them different.
Configuring the Backend Application in Development & Production
I'll go faster this time because what we learned from the frontend applies to the backend. It is even simpler because we will use Node to host development and production. The two environments are different because the development will continue to rely on mounting volume on the developer machine allowing editing TypeScript files locally and saving to have the container transpile into JavaScript and to host it. In development, we will rely on ts-node and in production we will use node directly and have all the JavaScript files hosted in the container.
Inside the services/backend, the Dockerfile looks like this:
# ---------------------------------------
# Development stage
# ---------------------------------------
FROM node:16 AS development
WORKDIR /node

COPY package*.json tsconfig.json ./

ARG NODE_ENV=development
ENV NODE_ENV=${NODE_ENV}

RUN npm install

WORKDIR /node/app
CMD ["npm", "run", "start:development"]

# ---------------------------------------
# Production stage
# ---------------------------------------
FROM node:16 AS production

WORKDIR /node

COPY package*.json tsconfig.json ./

# Default build argument is dev
ARG NODE_ENV=development
ENV NODE_ENV=${NODE_ENV}

RUN npm install

COPY . .
RUN npm run build

CMD ["npm", "run", "start:production"]
Docker Compose
The next step is to orchestrate the two Dockerfile. We want to build by calling a single command for both services. Same when it is the time to run the container. Docker Compose allows configuring every service and passing arguments like the environment variable down to the Dockerfile.
docker-compose.yml
The file contains three sections: the x-app, which are configuration shared between the services. Then the two services.
x-app: &default-app
  env_file:
    - ".env"
  restart: "${DOCKER_RESTART_POLICY:-unless-stopped}"
  stop_grace_period: "3s"
  tty: true
  healthcheck:
    interval: "60s"
    timeout: "3s"
    start_period: "5s"
    retries: 3

services:
  backend:
    <<: *default-app
    build:
      context: "./services/backend"
      dockerfile: Dockerfile
      target: ${NODE_ENV}
      args:
        - "NODE_ENV=${NODE_ENV}"
    ports:
      - "${DOCKER_SERVER_PORT_FORWARD}:${SERVER_PORT}"
    healthcheck:
      test: "${DOCKER_SERVER_HEALTHCHECK_TEST}"
    volumes:
      - "./services/backend:/node/app:delegated"
      - "/node/app/node_modules"

  frontend:
    <<: *default-app
    # depends_on:
    # - "backend"
    build:
      context: "./services/frontend"
      target: ${NODE_ENV}
      dockerfile: Dockerfile
      args:
        - "NODE_ENV=${NODE_ENV}"
    ports:
      - "${DOCKER_CLIENT_PORT_FORWARD}:${CLIENT_PORT}"
    healthcheck:
      test: "${DOCKER_CLIENT_HEALTHCHECK_TEST}"
    volumes:
      - "./services/frontend:/node/app:delegated"
      - "/node/app/node_modules"
The shared about the healthcheck. Each service has some common interval, but they also have specific endpoint to hit which mean each service will also define a test endpoint.
The frontend configuration starts with <<: *default-app, which means taking the configuration block and using it inside the service. That uses the data from x-app. I commented the depends_on, but once the frontend code calls the backend, it might be a good idea to ensure the backend is running first.
Then, the build instruction guides Docker to look in the ./services/frontend to find the dockerfile named Dockerfile. We also specify a target that is the stage phase. We are relying on the NODE_ENV, which means the value specified in the environment variable direct which build we are making. If you are working on your machine, it will get the value from the .env file. But, if you are running on a continuous integration system (CI), you can set the value to the desired configuration. In fact, you can have a third stage that runs unit tests in the Docker's container and has the CI setting the environment variable to test and once everything passes, create another build with a production target. Besides the target we have args. It injects is the place to inject values down to the Dockerfile. In the Dockerfile, you can access the value from Docker-Compose using ARG NODE_ENV
  frontend:
    <<: *default-app
    # depends_on:
    # - "backend"
    build:
      context: "./services/frontend"
      target: ${NODE_ENV}
      dockerfile: Dockerfile
      args:
        - "NODE_ENV=${NODE_ENV}"
    ports:
      - "${DOCKER_CLIENT_PORT_FORWARD}:${CLIENT_PORT}"
    healthcheck:
      test: "${DOCKER_CLIENT_HEALTHCHECK_TEST}"
    volumes:
      - "./services/frontend:/node/app:delegated"
      - "/node/app/node_modules"
The next section is ports, which are configured from outside the container port to an inside port. In that case, we set DOCKER_CLIENT_PORT_FORWARD to be open to consumers from outside the container, which will be proxied to the internal port CLIENT_PORT.
services:
  backend:
    <<: *default-app
    build:
      context: "./services/backend"
      dockerfile: Dockerfile
      target: ${NODE_ENV}
      args:
        - "NODE_ENV=${NODE_ENV}"
    ports:
      - "${DOCKER_SERVER_PORT_FORWARD}:${SERVER_PORT}"
    healthcheck:
      test: "${DOCKER_SERVER_HEALTHCHECK_TEST}"
    volumes:
      - "./services/backend:/node/app:delegated"
      - "/node/app/node_modules"
The backend is very similar. In both cases, we see that there are two volumes defined. The first one is the developer machine's code, followed by : and where it is mounted. The mounting destination is where the Docker's container will "see" the file. The frontend has :
./services/frontend:/node/app
It means that the developer folder ./services/frontend from the docker-compose.yaml folder will be visible in the Docker's container at this location in the container /node/app. The :delegated at the end is a performance booster for MAC OS (operating system). The second volume is to create an anonymous volume that will hide the node_modules. The node_modules from the developer computer are not being mounted to the container. The reason is that we want the container to have its own node_modules; it is pre-installed at build time, cached, and also on the right OS. If your Docker container is Linux and your developer machine a Windows, you wouldn't want to have the Docker container to mount your Windows dependencies in your Linux docker container. Hence, we anonymize the folder. The anonym tricks go along with the WORKDIR change to /node/app. As you saw earlier in this post, we are installing the NPM module in /node on the Docker's container and then moving one folder higher at /node/app. Then, we mount the developer machine source code into /node_app and then hide the /services/frontend/node_modules from Docker. Thus, Docker sees your TypeScript files, CSS, HTML, etc. but not the node_modules. Node and NPM work because if a folder cannot be found, it searches upward. It means it looks into the /node/ folder with a node_modules from the Docker's build step. In the end, the code can be executed with the proper dependencies from the right OS.
Finally, a file called docker-compose.production.yml must be created in the docker-compose directory that will override the volumes configuration to nothing for the production environment. We do not want anything mounted when we do a production build; we want the Docker contained to be self-sufficient and have all the compiled code ready to be served.
Commands
From this point few commands are important. First, we need to build the contained for the desired environment.
The first one, that must be executed in the directory of the docker-compose.yml is the build command.
docker-compose build
You can prefix the command with DOCKER_BUILDKIT=0 to get a commit hash at every step.
DOCKER_BUILDKIT=0 docker-compose build
With the commit hash you can debug Docker's build by using the
docker run -it <hash here> bash
I found it very useful to get into the container and see the folder and files.
Once the containers are built, it is time to run them.
docker-compose up
From there you can go in your browser and call http://localhost:port where port need to be replaced with the external port defined in the .env file. For example, the value from DOCKER_CLIENT_PORT_FORWARD for the frontend.
You can find the whole code in this Github Repository.