
Electronic Water Bottle 3D Printed Machine
Posted on:
When I was young, I had a dot-matrix printer, followed by an inkjet, a color inkjet, and, for over 15 years, a laser printer. A month ago, I bought my first 3d printer. I am late to the party, as they became more available a few years ago, but I never found the appeal, as many people seem to print toys or utility items for their printer instead of anything else. Recently, I started a list of projects that would benefit from having printed parts. I told myself that once I reach five real projects, I would give it a shot -- here I am!
The first project I wanted to try is to help my daughter feed her guinea pig. One issue is that she does not monitor the water in the bottles well. Thus, having an apparatus would signal when water is missing. The initial concept underwent a few iterations and, at the moment, is mostly complete, with a minor caveat: it does not work.
I am posting this blog post of the first few iterations as a milestone before I continue to improve. But first, let's go into some of the learning.
CAD - OnShape
I used to sketch 3d modeling Google Sketchup for a long time. So long as that, it is not owned by Google anymore. It is easy to use, but not the best for 3d printing. I had tried Autodesk Fusion over a year ago but never dug into it. Always something that blocked me. It could be the large amount of disk space, the licensing, and how hard it is to get the free version, or simply the complexity. However, this time, I tried OnShape which is online and free. OnShape has a large library of free tutorials and classes. After about 15 hours of tutorial and guided exercises, I was ready!
The Concept
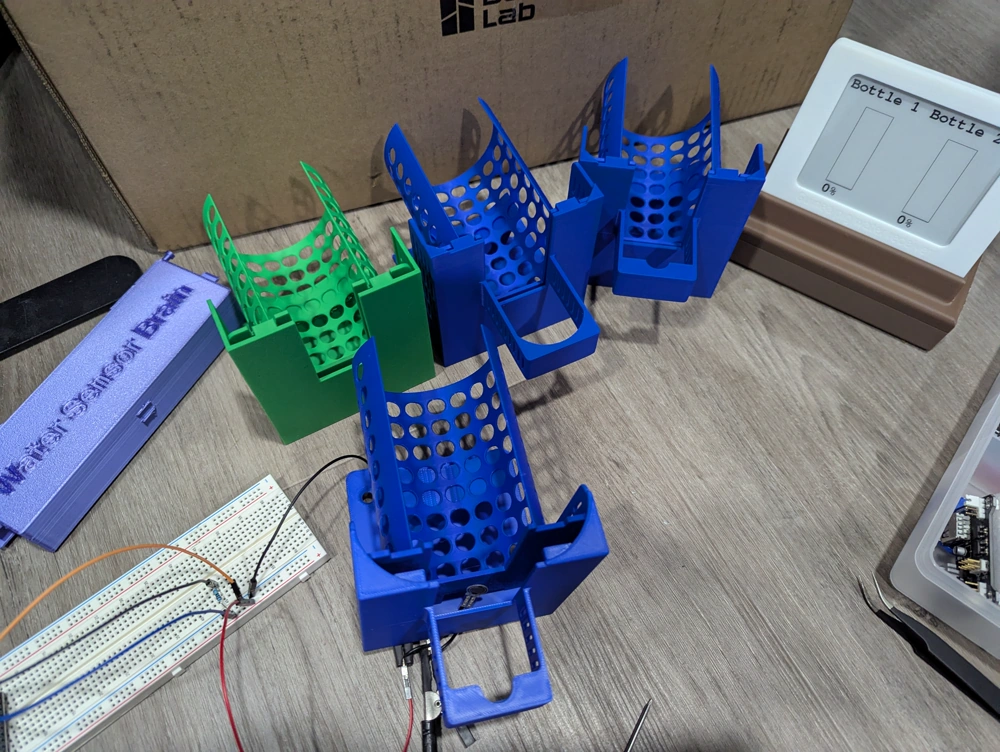
The idea was to create an enclosure around the bottle that would sit on a sensor that would give the weight of the bottle. Here is a 3d video of that latest iteration. So far, I have printed four iterations. The first one I learned was that a 1mm wall is too weak for some parts and that a 2mm wall is a lot better. 1mm was still fine for the surround of the bottle as it allows some movement when inserting the bottle. Then, having space between each part requires more than 0.2mm; 0.6mm is a good distance. Another learning experience was that the bottle turned when testing with the guinea pig; I had to add a straw blocker. Little things like that.
The water holder connects to a box. The box has one ESP32, the brain, that will connect to more than one bottle. The idea is to share 1 ESP for many bottles. In the process, I learn how to make a JSP connection allowing the bottle to have wires that connect and disconnect to the brain. That part is simple in terms of 3d parts but contains many wires.
The reality is that even with some improvement in term of wire management that without PCB it gets messy.
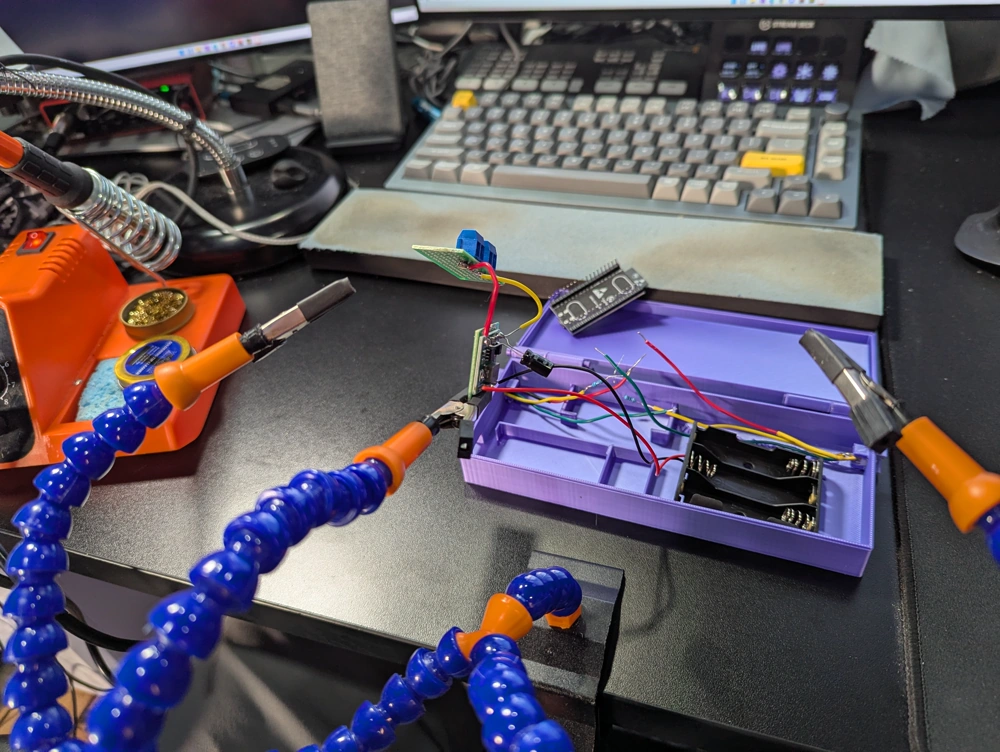
The brain or the "sender" relies on the DF9 sensor, which, when you push on the sensor, varies the values. It works well in theory and when I push with my finger. The idea was that the brain would be potentially not close to an electric outlet, thus would be powered by three AAA batteries using an MP1584EN for moving the voltage down (4.5v to 3.3v). The electronic schema looks like:
┌────────────────┐
│                │
│     3x AAA     │
│ +           -  │
└┬────────────┬──┘
┌┴────────────┴───┐
│ IN+       IN-   │
│    MP1584EN     │
│ Out+      Out-  │
└┬─────────────┬──┘
 │             │
 ├── +470µF- ──┤    // The capacitor is in a T shape between the MP1584EN and the ESP
 │(long)(short)│
┌┘             └──────────────┐
│                             │
│   ┌───────┐         ┌────┐  │
│   │       │         │    │  │
│ ┌─┤  DF9  ├─────────┤    │  │
│ │ │       │         │    │  │
│ │ └───────┘         │    │  │
│3.3v        GND─10kΩ─┘    │  │
│ │           │            │  │
└─┴─┐         │            │  │
  ┌─┴─────────┴───┐        │  │
  │ 3.3V     GND  │        │  │
  │     ESP-32    │        │  │
  │ GND   34      │        │  │
  └──┬────┬───────┘        │  │
     │    │                │  │
     │    │                │  │
     │    └────────────────┘  │
     └────────────────────────┘
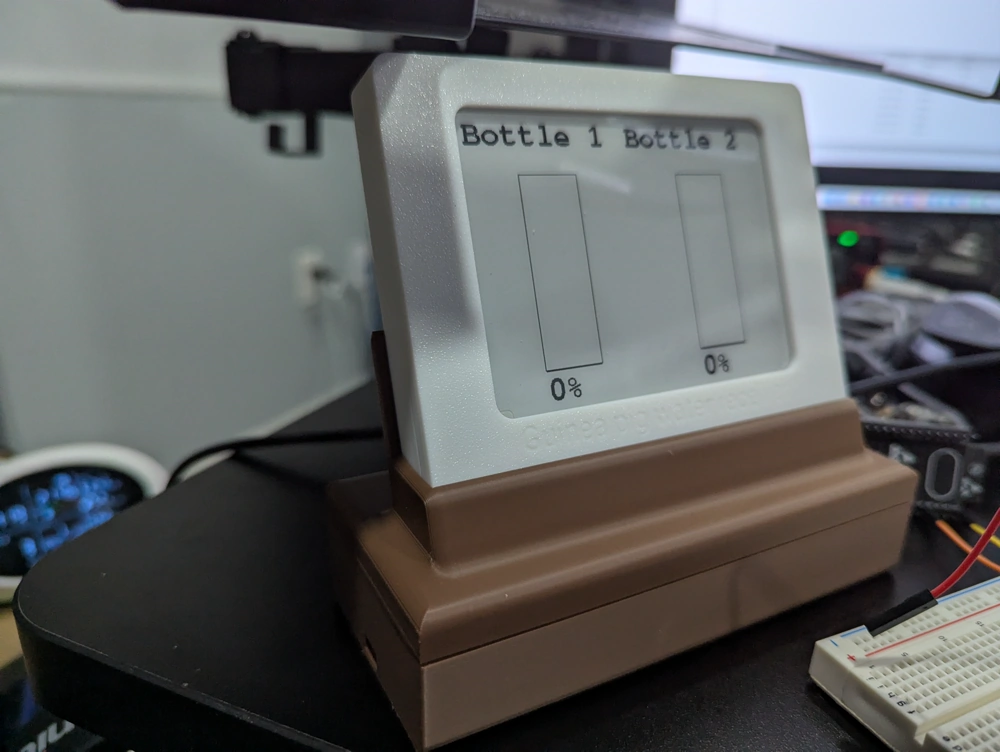
The other side is the screen. I decided to explore e-paper. This part contains another ESP that stays connected all the time since it is connected to the electricity via USB-C. Contrary to the sender who stays on for 1 reading then go into deep sleep for 30 minutes to preserve power, this one remains always online. The two parts communicate using ESP-Now, an efficient protocol to communicate that does not require Internet. It is fast, efficient and save the battery.
The code is relatively simple because of existing library to write to the e-paper. Here is 75% of the code:
void updateDisplay()
{
  if (!hasChanged){
    return;
 }
 hasChanged = false;
 int heightGauge = 200;
 int widthGauge = 70;
 int column1 = 5;
 int column2 = 200;

 int row1 = 30;
 int row2 = 290;

 int middle1 = ((column2-column1-widthGauge)/2);
 int middle2 = column2+((400-column2-widthGauge)/2);

  display.setFont(&FreeMonoBold18pt7b); // Or your normal font
  display.setFullWindow();
  display.firstPage();
  do {
    display.fillScreen(GxEPD_WHITE);

    // Header
    display.setCursor(column1, row1);
    display.print("Bottle 1");

    display.setCursor(column2, row1);
    display.print("Bottle 2");

    // Sensor values
    display.setCursor(middle1, row2);
    display.printf("%.0f%%", latestPercentage1);

    display.setCursor(middle2, row2);
    display.printf("%.0f%%", latestPercentage2);

    // Gauges
    drawGaugeRect(middle1, row1+30, heightGauge, widthGauge, latestPercentage1);
    drawGaugeRect(middle2, row1+30, heightGauge, widthGauge, latestPercentage2);
 } while (display.nextPage());
}

void drawGaugeRect(int x, int y, int heightGauge, int widthGauge, int percentage) {
 int filled = map(percentage, 0, 100, 0, heightGauge);
  display.drawRect(x, y, widthGauge, heightGauge, GxEPD_BLACK); // Gauge outline
  display.fillRect(x + 1, y + heightGauge - filled, widthGauge - 2, filled, GxEPD_BLACK); // Fill bar
}


void loop() {
 unsigned long now = millis();
  if (now - lastUpdate > updateInterval) {
 lastUpdate = now;
    updateDisplay();
 }
}
The result is stunning and the 3d printing enclosure worked as expected on the first print:
The Current Situation
Last evening, I decided to move everything from the breadboard to the soldering station. Ready to test and nothing. Checked the wire and still a read of zero. After some debugging, I realized something I should have done a long time ago. I never tested in any way the bottle and the system. I assumed because I was pushing the DF9 sensor that it would work. The flat surface of the DF9 indicates that any pressure parallel to the sensor would be enough. However, this is far from being true in practice. The pressure on the sensor was significantly greater than that of a full bottle. Modifying the resistor to a higher resistance could help. I started at 10k ohm, moved up to 100k, 400k, 600k, and 1 million ohm. 600 was not bad, 1 million to sensitive going quickly to 100% to 0% (or in term of input 4095 and 0). The issue is that the sensor does not work well with the current idea that a moving platform would move slightly up and down with water movement.
Learning
I have learned a few learning in this project.
- Hardware and electronics are a lot more time-consuming than the coding part. Iterating is longer and costly (time and part).
- Testing in a more realistic environment as fast as possible. While someone might say that I am still just in the beginning of the process of building this apparatus, I would have saved a few printings and many hours of CAD by doing more tests to see if the concept of the vertical platform on the DF9 was plausible.
- Parametric modeling is powerful, fun to do but can be frustrating when a change breaks several other parts.
- Building in CAD and then printing is very rewarding. I found it relaxing to design in CAD and then having the final product in real-life it awesome.
- A simple project takes a lot more time than expected.
- I need to step up my game while moving from breadboard to soldering because I am not having a fun ride. It is always challenging to get the connection, and when multiple wires need to connect, even using a green board produces an unclean result.
- I learned more about thinking about how to place elements to interact together in terms of distance and how the pragmatic distance of elements is important, allowing for screwing or passing wires.
Conclusion
I need to take a step back and think about the next design. Moving away from the pressure sensor, DF9, is a possibility. Converging the force of pressure could be a possibility as well. Besides the e-paper part, the brain and the box need to be rethought and reprinted. I'm writing this blog post because during dinner time, my son was upset because he hadn't succeeded at something. I related. However, I wasn't sad, and as I told him, failing is normal and part of the process. I might have failed, but now I know how to use CAD, use e-paper, crimp a JST clip, and use a slicer to print 3D...
Source code of the project: https://github.com/MrDesjardins/esp32-water-bottle