Entity Framework and the Unit of Work pattern
Posted on: 2013-12-16
Abstract
This article is a summary of how to make the use of a unit of work with Entity Framework. First of all, Entity Framework is a unit of work by itself. You can do multiple insert, update and delete and it's not until a SaveChanges that everything is committed to the Sql Server. The problem is that you may want to have multiple repositories. This mean that if you want to be under the same transaction that you want to share the save DbContext. Here comes the unit of work, a pattern that share the DbContext. The reference of DbContext is shared across repositories, which is interesting because if we want to be domain driven we can share the DbContext between repositories of the same domain. It's also interesting for unit testing. The reason is that the unit of work has interface which can be easily mocked.
I have seen an article on Asp.Net website concerning Entity Framework and the unit of work pattern but I believe it's wrong. I prefer the one of Julie Lerman in her Pluralsight video. The main reason is the one of Asp.Net includes the repository inside the unit of work and the DbContext. The one of Julie Lerman only contain the DbContext and the unit of work is passed through every repositories of the domain.
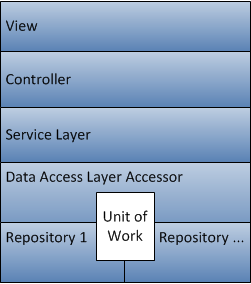
Here is the representation of every layers that we would like with the unit of work.

As you can see, the controller should contact the service layer where all queries are from databases, access to caching services and web services are executed. For the database part, we contact the data access layer accessor which is an abstraction for the unit of work and repositories. This allow every developers that use repositories to abstract the need to create the unit of work and to pass it through constructors. The accessor does have a reference to repositories and to the unit of work.
This article explains how to create a layered approach that has a controller, a service layer, a data access layer accessor with repositories and unit of work with a simple set of entities. I already have wrote an article for repository and entity framework. This was an other simpler way to design the repository. Previously, a facade was passing the DbContext to all repository, which was created the same behavior as the unit of work pattern. However, the unit of work is more elaborate and allows to unit test easily and allow you to reuse repository in several DbContext if required. Having the possibility to create several DbContext and to share it by domain (for domain driven design) is important for big software. It increase the performance of the database context by having a limited amount of entity to handle. So, the previous way to handle repository is perfect if you have under 50 entities. This is a rule of thumb and it depends of many factors. If you have a lot of entities and that you can draw specific domains, the approach of unit of work in this post is preferable. As you will see, a lot of more classes will be needed and this is not a small detail to consider before going into this way.
Creating the entities, the database context and the tables
First of all, let's create entities and a simple context that we will call directly from the controller. This should never been done in enterprise but it will allow us to migrate the code from a simple basic code to a more heavy layered application.
public class Animal {
  public int Id { get; set; }
  public string Name { get; set; }

  public virtual ICollection<Animal> Enemies { get; set; }
  public virtual ICollection<Animal> EnemyOf { get; set; }
}

public class Cat : Animal {
  public int NumberOfMustache { get; set; }
  public int RemainingLife{get;set;}
}

public class Dog : Animal {
  public string Type { get; set; }
}
We have two classes, one is for Cat and one is for Dog. Both inherit from Animal class. These are very simple classes because we want to focus on the unit of work and not on complex classes. The next step is to create the database context.
The first step is to get Entity Framework. This can be done by using Nuget with the interface ("Manage Nuget Package") or with a command line :
PM> install-package entityframework
Then, we need to inherit from DbContext and setup web.config to have a connection string for the database. The web.config looks like this:
 <configuration>
  <configSections>
    <section name="entityFramework" type="System.Data.Entity.Internal.ConfigFile.EntityFrameworkSection, EntityFramework, Version=6.0.0.0, Culture=neutral, PublicKeyToken=b77a5c561934e089" requirePermission="false" />
  </configSections>
 <connectionStrings>
  <add name="EntityConnectionString" connectionString="Data Source=PATRICK-I7\\SQLEXPRESS;Initial Catalog=UnitOfWork;Integrated Security=SSPI;" providerName="System.Data.SqlClient" />
 </connectionStrings>
The first is that we have a new configSection for Entity Framework. This has been added automatically. The line that is required to be added manually is the connection string.
The last step is to configure the entity. Since we are simplify the whole application for the purpose of the unit of work, the model class will be directly the entity. Some may want in enterprise application have an additional layer to not share entity classes with the model.
public class AllDomainContext:DbContext {
  public AllDomainContext():base("EntityConnectionString") { }

  protected override void OnModelCreating(DbModelBuilder modelBuilder) {
    base.OnModelCreating(modelBuilder);

  //Table per type configuration
  modelBuilder.Entity<Dog>().ToTable("Animals");
  modelBuilder.Entity<Dog>().ToTable("Dogs");
  modelBuilder.Entity<Cat>().ToTable("Cats");

  //Primary keys configuration
  modelBuilder.Entity<Animal>().HasKey(k => k.Id);

  modelBuilder.Entity<Animal>()
  .HasMany(entity => entity.Enemies)
  .WithMany(d => d.EnemyOf)
  .Map(d => d.ToTable("Animals_Enemies_Association").MapLeftKey("AnimalId").MapRightKey("EnemyId"));
  }
}
The configuration has something special for the Enemies list because I did not wanted to handle the the association table by myself. Entity Framework can handle it for us by configure a many to many relationship with the animal class. It requires to have a table name for the many-many table with a foreign keys.
Setup the controllers, service layer and data access layer
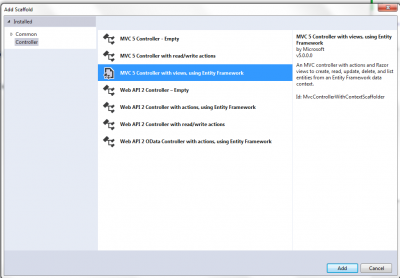
Before even having the service layer, let's use the context directly into the controller and see the database creation. Then, we will change to code every layers but not the unit of work yet. We can use scaffolding to leverage Visual Studio power to get code generation for us. First step, right click the controller and select add new controller.

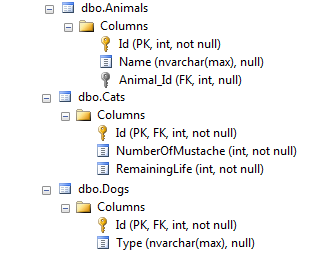
The second step is to select to model class, you can select the one of Animal and select the DbContext class. If you do not see your DbContext class (DatabaseContext), close the window and compile your application. The wizard bases its choice on the compiled resource of the project. Once generated, you can execute the code, IIS Express start by default and you just need to go to http://localhost:15635/Animal and the DbContext will start the creation of the database. If you open SQL Server Manager, the unit of work database should have 3 tables.

Transforming to have service layers
At this stage, the architecture of the web application is not enterprise grade. The controller has a strong reference to the database context. The next step is to have everything related to the database inside a service layer which abstract entity framework. This allow us to test easily the controller without having to care about the database.
This is the current controller code at this moment.
public class AnimalController : Controller {
  private DatabaseContext db = new DatabaseContext();

  public ActionResult Index() { return View(db.Animals.ToList()); }

  public ActionResult Details(int? id) {
    if (id == null) {
      return new HttpStatusCodeResult(HttpStatusCode.BadRequest);
    }
    Animal animal = db.Animals.Find(id);
    if (animal == null) {
      return HttpNotFound();
    }
     return View(animal);
  }

  public ActionResult Create() { return View(); }

  [HttpPost]
  [ValidateAntiForgeryToken]
  public ActionResult Create([Bind(Include="Id,Name")] Animal animal) {
    if (ModelState.IsValid) {
      db.Animals.Add(animal); db.SaveChanges(); return RedirectToAction("Index");
    }

    return View(animal);
  }

  public ActionResult Edit(int? id) {
    if (id == null) {
      return new HttpStatusCodeResult(HttpStatusCode.BadRequest);
    }
    Animal animal = db.Animals.Find(id);
    if (animal == null) {
      return HttpNotFound();
    }
    return View(animal);
  }

  [HttpPost]
  [ValidateAntiForgeryToken]
  public ActionResult Edit([Bind(Include="Id,Name")] Animal animal) {
    if (ModelState.IsValid) {
      db.Entry(animal).State = EntityState.Modified;
      db.SaveChanges();
      return RedirectToAction("Index");
    }
    return View(animal);
  }

  public ActionResult Delete(int? id) {
    if (id == null) {
      return new HttpStatusCodeResult(HttpStatusCode.BadRequest);
    }
    Animal animal = db.Animals.Find(id);
    if (animal == null) {
      return HttpNotFound();
    }
    return View(animal);
  }

  [HttpPost, ActionName("Delete")]
  [ValidateAntiForgeryToken]
  public ActionResult DeleteConfirmed(int id) {
    Animal animal = db.Animals.Find(id); db.Animals.Remove(animal);
    db.SaveChanges();
    return RedirectToAction("Index");
  }

  protected override void Dispose(bool disposing) {
    if (disposing) {
      db.Dispose();
    }
    base.Dispose(disposing);
  }
}
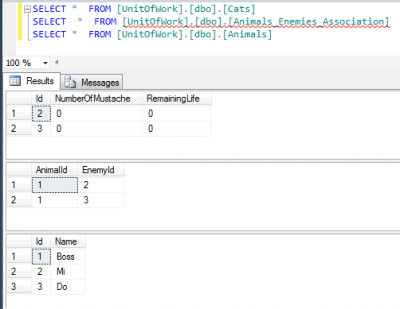
If you want to test rapidly the database, just add the code in the index.
public ActionResult Index() {
   var animal1 = new Animal { Name = "Boss" };
   var cat1 = new Cat { Name = "Mi" };
   var cat2 = new Cat { Name = "Do" };
   animal1.Enemies = new List<Animal> { cat1,cat2};
   db.Animals.Add(animal1);
   db.Animals.Add(cat1);
   db.Animals.Add(cat2);
   db.SaveChanges();
   return View(db.Animals.AsNoTracking().ToList());
}

The first step is to create a repository class for animal inside the DataAccessLayer folder. Normally, I create a folder called Repository to have all repositories.
 public class AnimalRepository : IAnimalRepository {
  private DatabaseContext db = new DatabaseContext();

  public Models.Animal Find(int? id) { return db.Animals.Find(id); }

  public void Insert(Models.Animal animal) { db.Animals.Add(animal); db.SaveChanges(); }

  public void Update(Models.Animal animal) { db.Entry(animal).State = EntityState.Modified; db.SaveChanges(); }

  public void Delete(Models.Animal animal) { db.Animals.Remove(animal); db.SaveChanges(); }

  public void Dispose() { db.Dispose(); }

  public IList<Animal> GetAll() { return db.Animals.AsNoTracking().ToList(); }
}
This class as also an interface with the public method in it.
The second step is to create a service layer. Normally, we would create a new project, but to keep everything simple, let's just add a new folder (namespace). Then, we move the DatabaseContext class from the controller to the service.
The animal service class looks like the following code.
public class AnimalService: IAnimalService {
  private IAnimalRepository animalRepository;

  public AnimalService(IAnimalRepository animalRepository) { this.animalRepository = animalRepository; }

  public Models.Animal Find(int? id) { return this.animalRepository.Find(id); }

  public void Insert(Models.Animal animal) { this.animalRepository.Insert(animal); }

  public void Update(Models.Animal animal) { this.animalRepository.Update(animal); }

  public void Delete(Models.Animal animal) { this.animalRepository.Delete(animal); }

  public IList<Animal> GetAll() { return this.animalRepository.GetAll(); }
}
It's all the code from the controller. Later, some improvement should be done. One of this change is to move the SaveChanges because it's not interesting to save every time we add, modify or update an entity. This cause performance problem when several entities are required to be posted to the database. However, let's focus on the transformation first, later these details will be gone. The role of the service layer is to resemble every repository. In this situation we have only one repository. In fact, in more complex problem like in enterprise, a service has several repository and caching classes.
The next class that require changes is the animal controller class. This one now has a constructor that need an IAnimalService.
public class AnimalController : Controller {
  private IAnimalService_service;

  public AnimalController() {_service = new AnimalService(new AnimalRepository()); }

  public AnimalController(IAnimalService animalService) {_service = animalService; }

  public ActionResult Index() { return View(_service.GetAll()); }

  public ActionResult Details(int? id) {
    if (id == null) {
      return new HttpStatusCodeResult(HttpStatusCode.BadRequest);
    }
    Animal animal =_service.Find(id);
    if (animal == null) {
      return HttpNotFound();
    }
    return View(animal);
  }

  public ActionResult Create() { return View(); }

  [HttpPost]
  [ValidateAntiForgeryToken]
  public ActionResult Create([Bind(Include="Id,Name")] Animal animal) {
    if (ModelState.IsValid) {
      _service.Insert(animal);
      return RedirectToAction("Index");
    }

  return View(animal); }

  public ActionResult Edit(int? id) { if (id == null) {
    return new HttpStatusCodeResult(HttpStatusCode.BadRequest);
  }

  Animal animal =_service.Find(id);

  if (animal == null) { return HttpNotFound(); }

  return View(animal); }

  [HttpPost]
  [ValidateAntiForgeryToken]
  public ActionResult Edit([Bind(Include="Id,Name")] Animal animal) {
    if (ModelState.IsValid) {
      _service.Update(animal);
      return RedirectToAction("Index");
    }
    return View(animal);
  }

  public ActionResult Delete(int? id) {
    if (id == null) {
      return new HttpStatusCodeResult(HttpStatusCode.BadRequest);
    }
    Animal animal =_service.Find(id);
    if (animal == null) {
      return HttpNotFound();
    }

    return View(animal);
  }

  [HttpPost, ActionName("Delete")]
  [ValidateAntiForgeryToken]
  public ActionResult DeleteConfirmed(int id) {
    Animal animal =_service.Find(id);
    _service.Delete(animal);
    return RedirectToAction("Index");
  }
}
At this stage, the controller is separated from the database by the service and the repository. Still, it's better to not having a strong reference to AnimalService inside the controller. This is why we will extract an interface from AnimalService and we will inject the concrete class by inversion of control. This allow us to have when doing test entry point to inject a fake AnimalService that won't goes to the database. You can use the refactoring tool to extract the interface easily.

 public interface IAnimalService {
  void Delete(Animal animal);
  Animal Find(int? id);
  IList<Animal> GetAll();
  void Insert(Animal animal);
  void Update(Animal animal);
}
Inside the controller, we have two constructors. One to help us for this example which instantiate the service layer and the real one that takes a single parameter. This is the one that you should have in your enterprise grade software because it can inject any thing of IAnimalService into the controller.
public class AnimalController : Controller {
  private IAnimalService_service;

  public AnimalController(IAnimalService animalService) {
    _service = animalService;
  }
  //...
Before implementing the unit of work, we will create a new repository to illustrate why the unit of work is required. We will also do a little re-factoring by changing the repository to stop having automatically a call to SaveChanges. This allow us to insert several entities in a single transaction.
This is now the animal service class and interface.
public interface IAnimalService {
  void Delete(Animal animal);
  void Delete(IList<Animal> animals);
  Animal Find(int? id); IList<Animal> GetAll();
  void Save(Animal animal);
  void Save(IList<Animal> animal);
}

public class AnimalService: IAnimalService {
  private IAnimalRepository animalRepository;

  public AnimalService(IAnimalRepository animalRepository) {
    this.animalRepository = animalRepository;
  }

  public Models.Animal Find(int? id) {
    return this.animalRepository.Find(id);
  }

  public void Delete(IList<Animal> animals) {
    foreach (var animal in animals) {
      this.animalRepository.Delete(animal);
    }

    this.animalRepository.Save();
  }

  public void Delete(Models.Animal animal) {
    this.Delete(new List<Animal> { animal });
  }

  public IList<Animal> GetAll() {
    return this.animalRepository.GetAll();
  }

  public void Save(Animal animal) {
    Save(new List<Animal> { animal });
  }

  public void Save(IList<Animal> animals) {
    foreach (var animal in animals) {
      if (animal.Id == default(int)) {
        this.animalRepository.Insert(animal);
      } else {
        this.animalRepository.Update(animal);
      }
    }

    this.animalRepository.Save();
  }
}
As you can see, it's better. It also hide the complexity for update and insert by having a single method "save". Next, we will create a new repository. We won't code its detail but we will use it inside the AnimalService to simulate a case where we need to interact on several entities.
public class HumanRepository : IHumanRepository { }
public interface IHumanRepository {
  void Insert(Models.Human humain);
}
We also need to modify the service to have in its constructor the IHumanRepository.
public class AnimalService: IAnimalService {
  private IAnimalRepository animalRepository;
  private IHumanRepository humanRepository;

  public AnimalService(IAnimalRepository animalRepository, IHumanRepository humanRepository) {
    this.animalRepository = animalRepository;
    this.humanRepository = humanRepository;
  }
  //...
}
Then we can simulate the need to have something in the same transaction between animal and human repository. This can be in the Save method of the AnimalService. Let's create a new save method in the service which take an Animal and also an Human. In IAnimalService we add.
void SaveAll(Animal animal, Human humain);
And in the concrete implementation we have :
public void SaveAll(Animal animal, Human humain) {
  his.animalRepository.Insert(animal);
  this.humanRepository.Insert(humain);
}
This is where the unit of work is required. The animal repository has its own DbContext and the human repository has its one two. Since both have not the same repository, they are in two different transaction. We could wrap these both lines with a TransactionScope but since Entity Framework is already a transaction scope and since in more complex scenario where we would want to use the DbContext furthermore, having to use the same DbContext is something viable.
Implementing Unit of Work pattern
As we have seen, we need to share the DbContext. This is where the unit of work shines. The first move is to create the unit of work which hold the DbContext.
public interface IUnitOfWork { IDbSet<T> Set<T>() where T:class;

DbEntityEntry<T> Entry<T>(T entity) where T:class;

void SaveChanges(); }
The interface could be richer but this should be the minimal number of methods. The implementation is only having a central point for every database sets. In a more domain driven design application we could restrain entities by having a DbContext that is less general than the one created. "AllDomainContext" contains all entities set. This is perfect to create the whole database or when your application has a limited number of entities (under 50). But if you are domain driven design or with a big application, to have Entity Framework perform well and restrict the domains, having several DbContext is a good solution. With unit of work and its generic T class, you can pass any domain you want to have.
public class UnitOfWork<T>:IUnitOfWork where T : DbContext, new() {
  public UnitOfWork() {
    DatabaseContext = new T();
  }

  private T DatabaseContext { get; set; }

  public void SaveChanges() { DatabaseContext.SaveChanges(); }

  public System.Data.Entity.IDbSet<T> Set<T>() where T : class { return DatabaseContext.Set<T>(); }

  public DbEntityEntry<T> Entry<T>(T entity) where T : class { return DatabaseContext.Entry<T>(entity); }
}
This unit of work is very general since it can takes T as set. This mean that any entity defined can be used. In our example, with this modified unit of work, the controller needs to be changed too.
public class AnimalController : Controller {
  private IAnimalService_service;

  public AnimalController() {
    var uow = new UnitOfWork<AllDomainContext>();
    _service = new AnimalService(uow, new AnimalRepository(uow), new HumanRepository(uow));
  }

  public AnimalController(IAnimalService animalService) {
    _service = animalService;
  }
  //...
}
So, the unit of work is instantiated with the domain we want. Here, it's everything. We still have the "real" constructor that takes only the IAnimalService which is the one that should be used in the real application with inversion of control to inject the controller. Since it's an article, to keep it simple, I show you what the IoC should do in the background.
The animal service is changed too to work with the unit of work.
public class AnimalService: IAnimalService {
  private IAnimalRepository animalRepository;
  private IHumanRepository humanRepository;
  private IUnitOfWork unitOfWork;
  public AnimalService(IUnitOfWork unitOfWork, IAnimalRepository animalRepository, IHumanRepository humanRepository) {
    this.unitOfWork = unitOfWork;
    this.animalRepository = animalRepository;
    this.humanRepository = humanRepository;
  }

  public Animal Find(int? id) { return this.animalRepository.Find(id); }

  public void Delete(IList<Animal> animals) {
    foreach (var animal in animals) {
      this.animalRepository.Delete(animal);
    }

    this.unitOfWork.SaveChanges();
  }

  public void Delete(Models.Animal animal) { this.Delete(new List<Animal> { animal }); }

  public IList<Animal> GetAll() { return this.animalRepository.GetAll(); }

  public void Save(Animal animal) { Save(new List<Animal> { animal }); }

  public void Save(IList<Animal> animals) {
    foreach (var animal in animals) {
      if (animal.Id == default(int)) {
        this.animalRepository.Insert(animal);
      } else {
        this.animalRepository.Update(animal);
      }
    }

    this.unitOfWork.SaveChanges();
  }

  public void SaveAll(Animal animal, Human humain) {
    this.animalRepository.Insert(animal);
    this.humanRepository.Insert(humain);
    this.unitOfWork.SaveChanges();
  }
}
The repository now accepts the unit of work. It can works with set defined in the domain without problem.
public class AnimalRepository : WebsiteForUnitOfWork.DataAccessLayer.Repositories.IAnimalRepository {
  private IUnitOfWork UnitOfWork { get; set; }

  public AnimalRepository(IUnitOfWork unitOfWork) { this.UnitOfWork = unitOfWork; }

  public Models.Animal Find(int? id) { return UnitOfWork.Set<Animal>().Find(id); }

  public void Insert(Models.Animal animal) { UnitOfWork.Set<Animal>().Add(animal); }

  public void Update(Models.Animal animal) { UnitOfWork.Entry(animal).State = EntityState.Modified; }

  public void Delete(Models.Animal animal) { UnitOfWork.Set<Animal>().Remove(animal); }

  public IList<Animal> GetAll() { return UnitOfWork.Set<Animal>().AsNoTracking().ToList(); }
}
It's possible to continue to improve the unit of work and Entity Framework by going further in the use of the repository. But, what have been shown here is enterprise graded repository design. It allows you to divide the domain and improve the performance of Entity Framework by the same time. It allows to have an abstraction between the Asp.Net MVC front and the Entity Framework. It easily testable because we use interface which can be mocked easily. Benefits are clear but the price to pay is the overwhelm required to support this infrastructure. More classes need to be in place. Still, the version presented is light and once the setup is done, adding new entity is only a matter of editing the context in which it belongs and create into the repository what action is needed.
Source code
You can find the source code on GitHub for this Unit of work example.
