
Side Project: Exercise Machine using Water
Posted on: 2022-04-07
Last summer, I unsuccessfully moved a kid-inflated pool - it contained too much water. The mass volumic of the water tricked me! Forward to this past winter, I had the idea to create an exercise machine where the source of weight is water. Water has the characteristic to be almost free and also that it can be moved automatically with a pump. Hence, the core idea of having a machine adjust by itself depends on the exercise and the current sets.
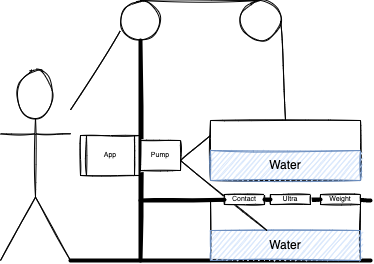
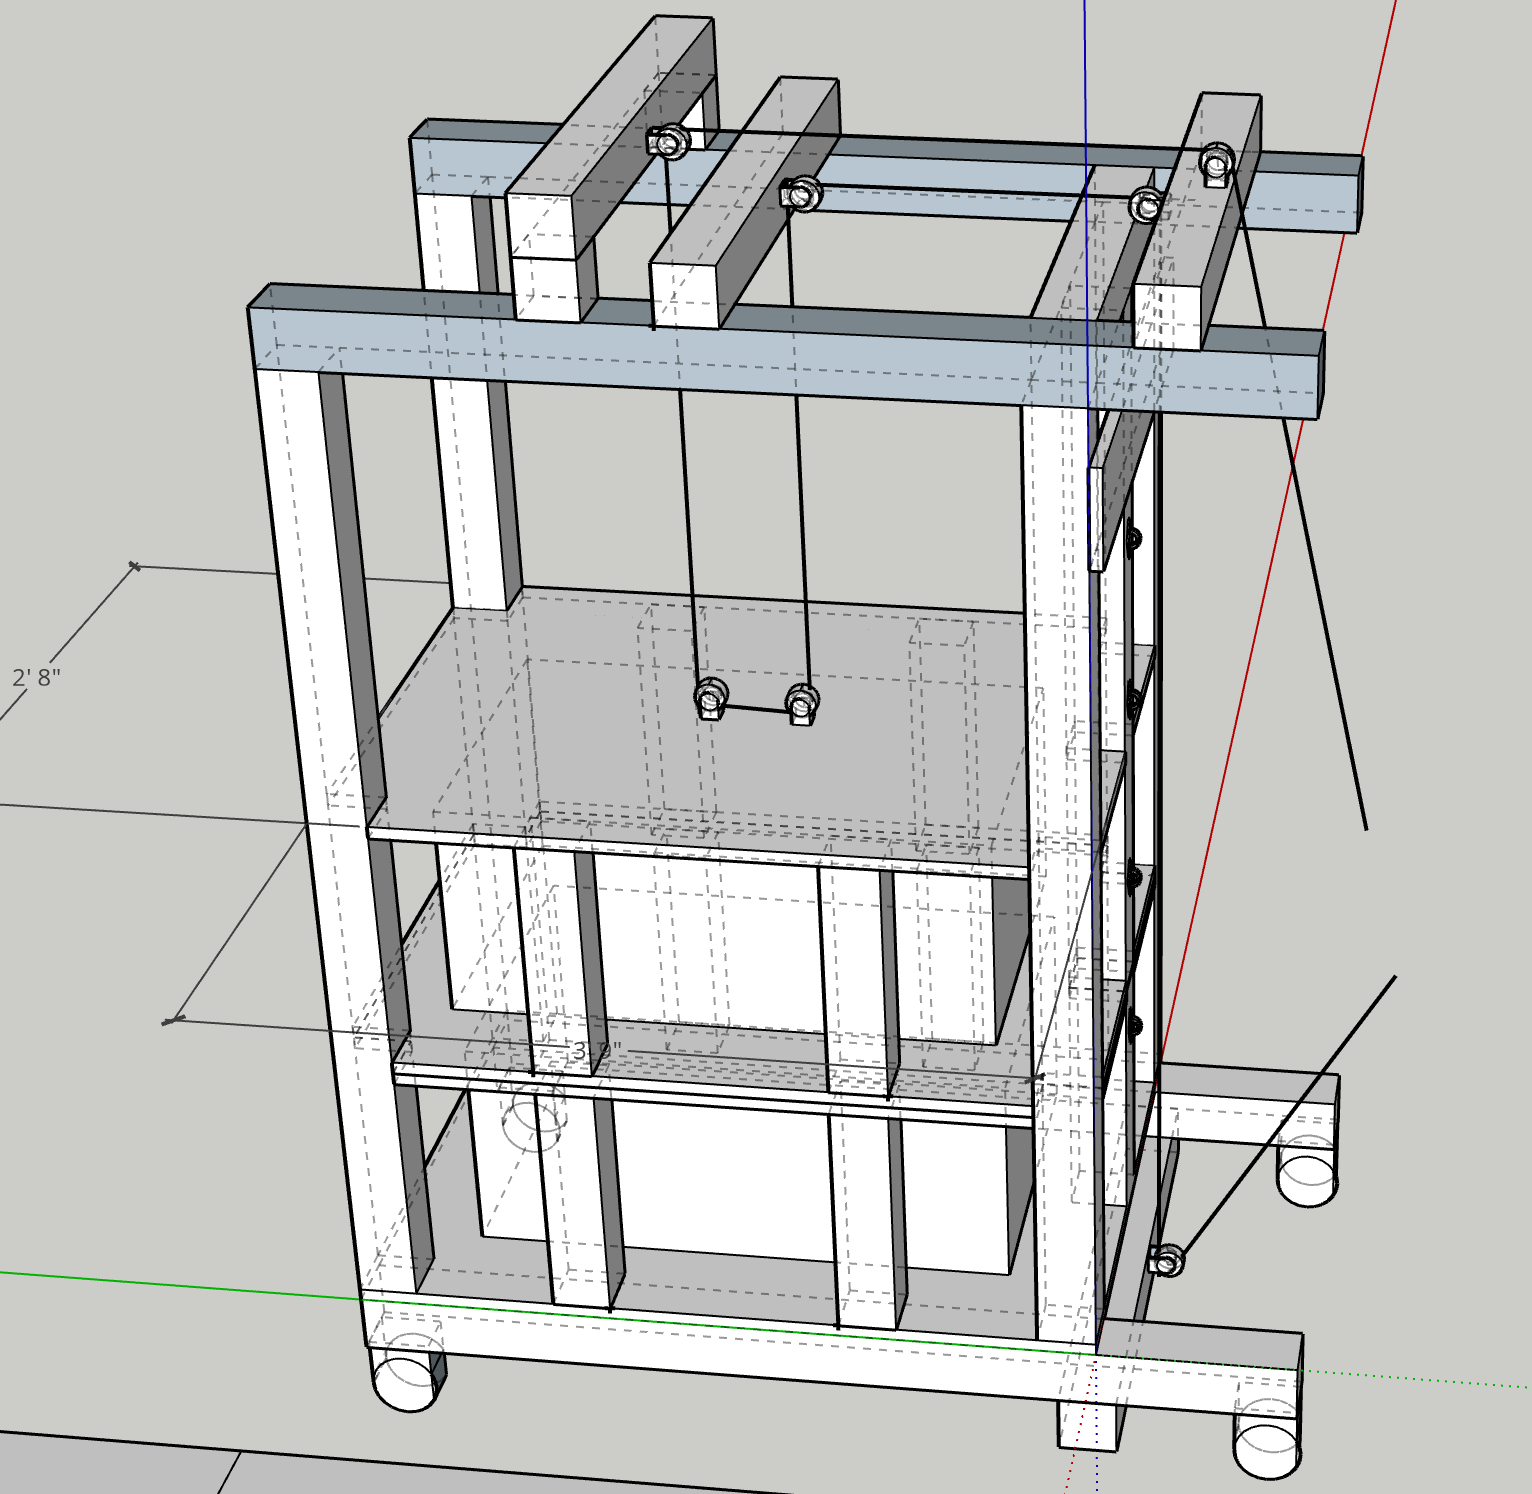
The image describes how the machine operates. The human can pull from the top (tricep) or the bottom (bicep), which lifts a tank of water. The weight is calculated when the upper tank gets back on the middle platform. The delta is determined, and the water pump adds or removes water. With a small ultrasonic sensor, the user can also see the tempo by repetition on the screen.
Building the Software
I started building the software in parallel to designing the physical machine's detail. By doing the development in parallel, I could sustain my motivation and have ideas.
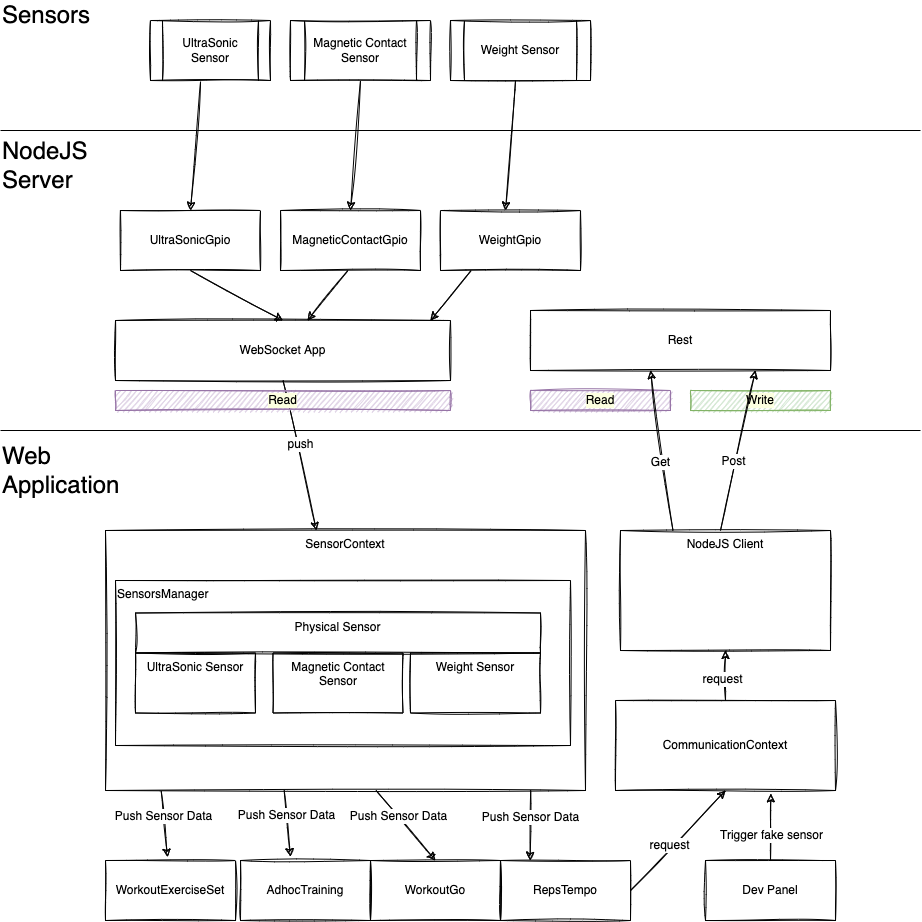
The software is open-source and build using TypeScript, SolidJS, WebSocket and NodeJS. The high-level architecture diagram shows how the information flows. There are sensors pushing data to Raspberry PI physical pins. The NodeJS server listened to these pins and interpreted the data to be pushed in real-time with Websocket to the user interface built using SolidJS. The SolidJS application language is TypeScript and uses Websocket and Canvas to draw the real-time movement of each repetition.
Dev Features
I will highlight two features dedicated to development that I think is crucial for a good development experience.
Storybook
The system gives you two choices when launching the web application: the main application or the storybook. The storybook provides access to the custom-created components. Hence, we can work on the components without having to find a place in the system. Indeed, on the actual machine, the launcher does not appear.
Hidden Dev Panel
There is a dev panel under the visual viewport of the application, which is 1024x600 because we are using a Raspberry PI with a monitor of this fixed resolution. The panel allows sending a signal by REST API to the NodeJS to send fake signals. Hence, we can develop our software from client to server without having the server (NodeJS) connecting to the actual Raspberry to get real signals. Therefore, it helps a lot in the development and forces to create good abstractions.
User Features
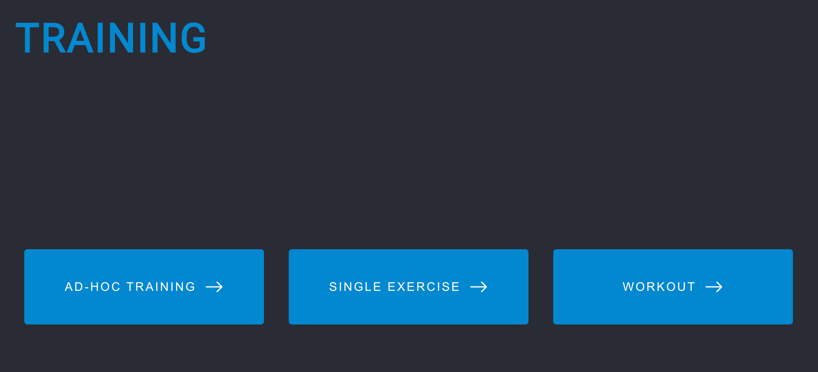
The user interface input and output orbit around a touchscreen. The system consists of three modes accessible using one of the three large buttons.
Ad-Hoc
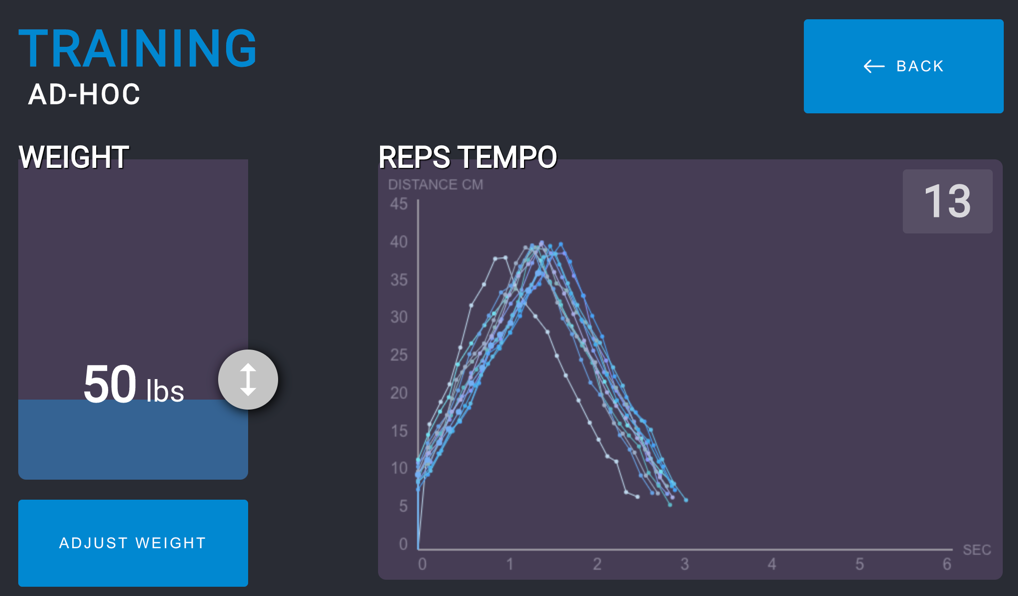
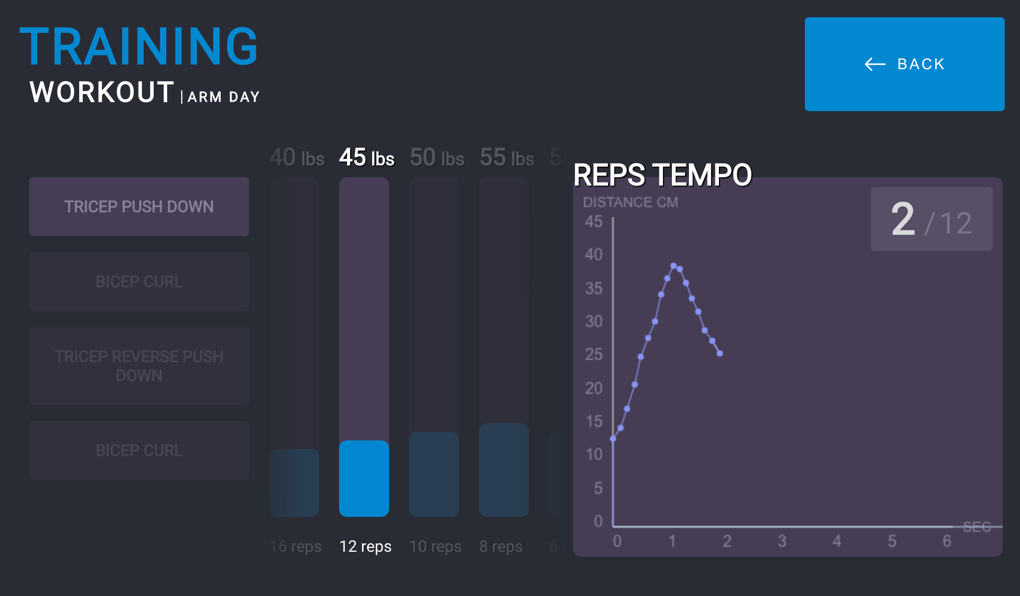
The first feature is called Ad-hoc Training, which allows using the machine without relying on previous data: you set the weight and perform some repetition. On the top is the consistent title and navigation bar across all modes. The user can slide the weight up and down on the left side and then ask the machine to pump the water accordingly. Finally, the amount of repetition completed in the active set on the right side. In the illustration, we see that the user is at repetition #13. We can also see in real-time the distance from the platform in time and realize if we are constantly in the way we are lifting the weight.
Single Exercise
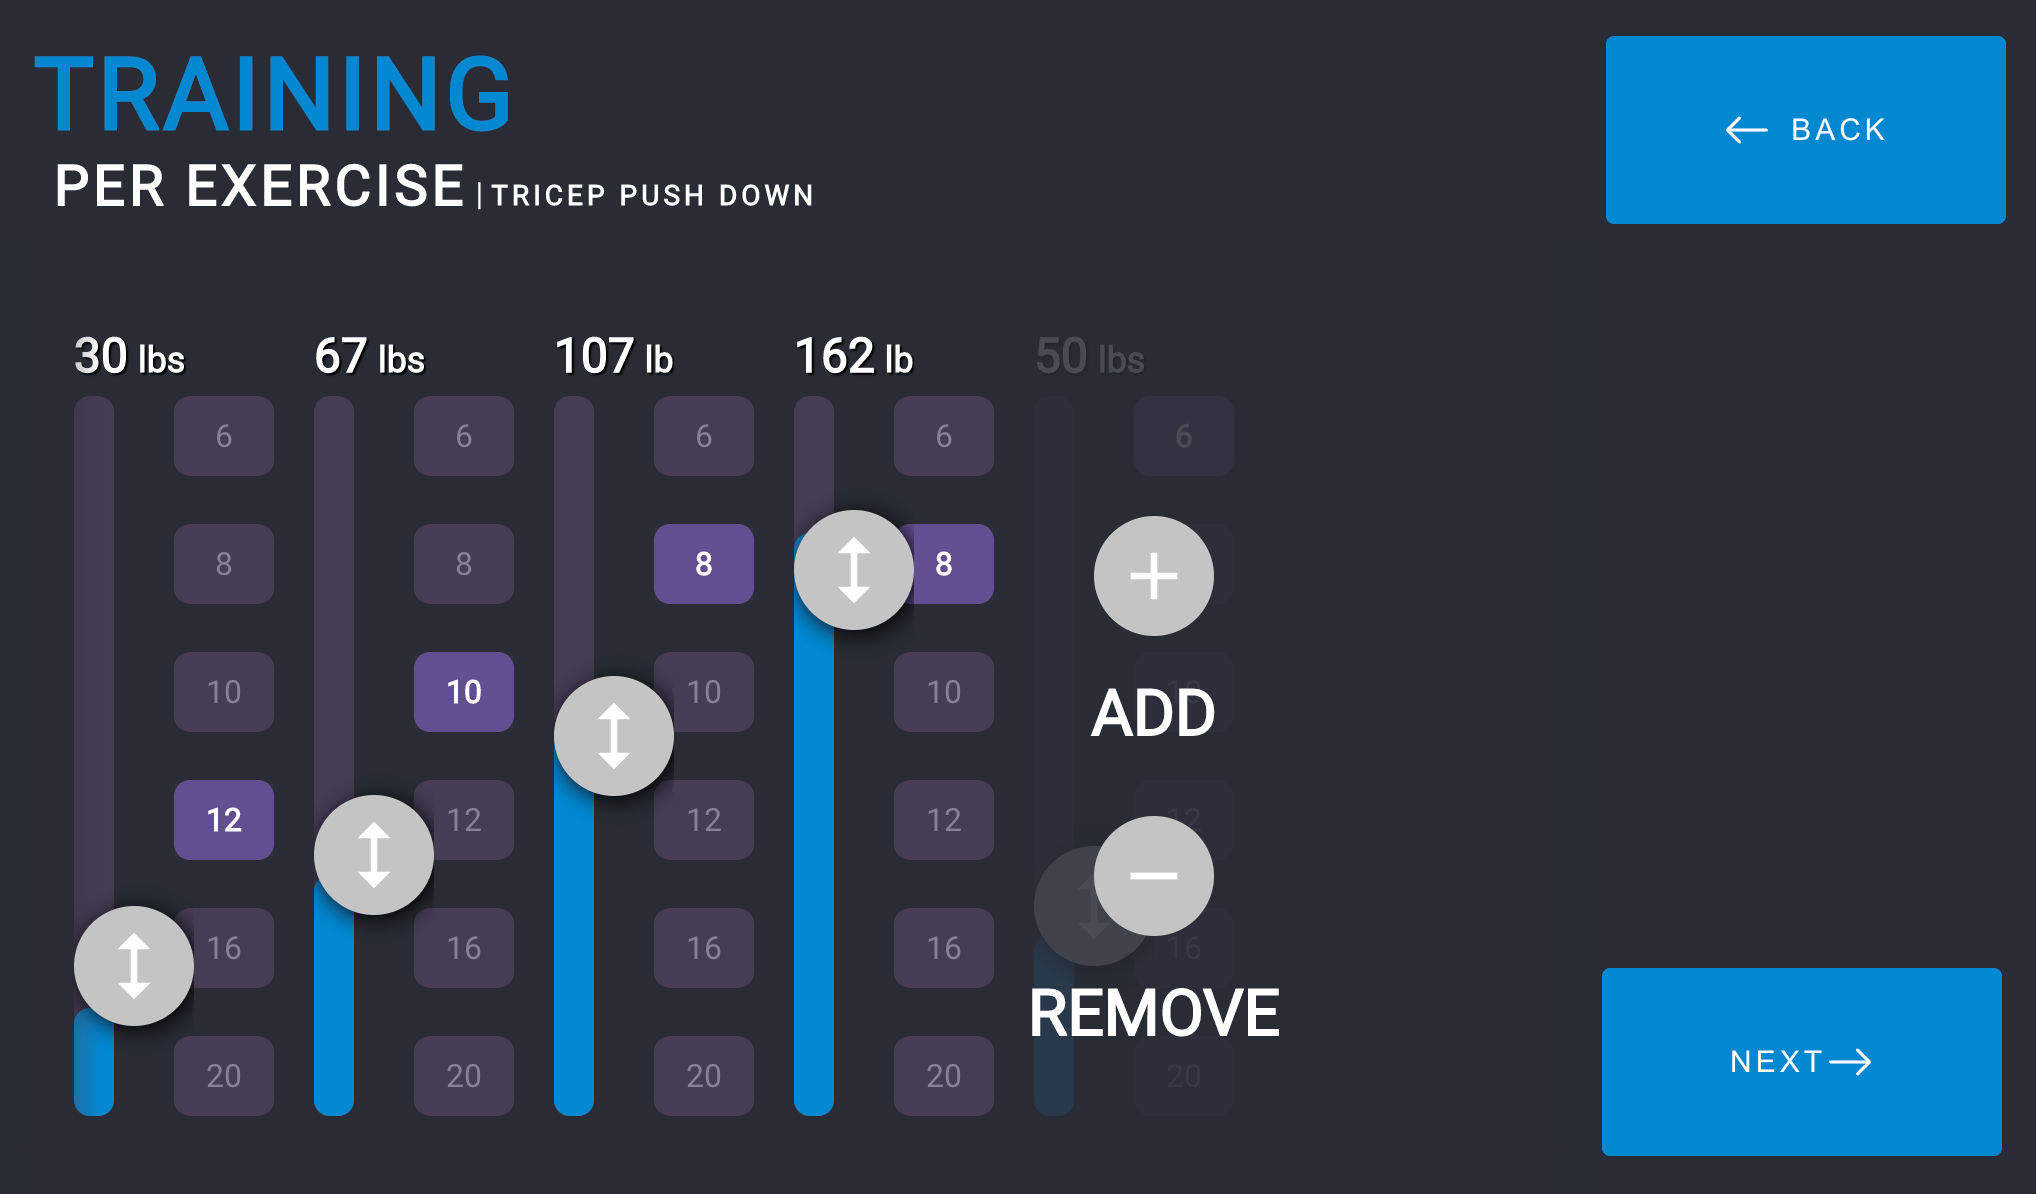
The second mode is called Single Exercise, leading to a page with many different exercises the machine lets you perform. The idea is that we store the last time number of sets and repetitions for each exercise. For example, if you select "Tricep Push Down", you can choose four sets of different repetitions.
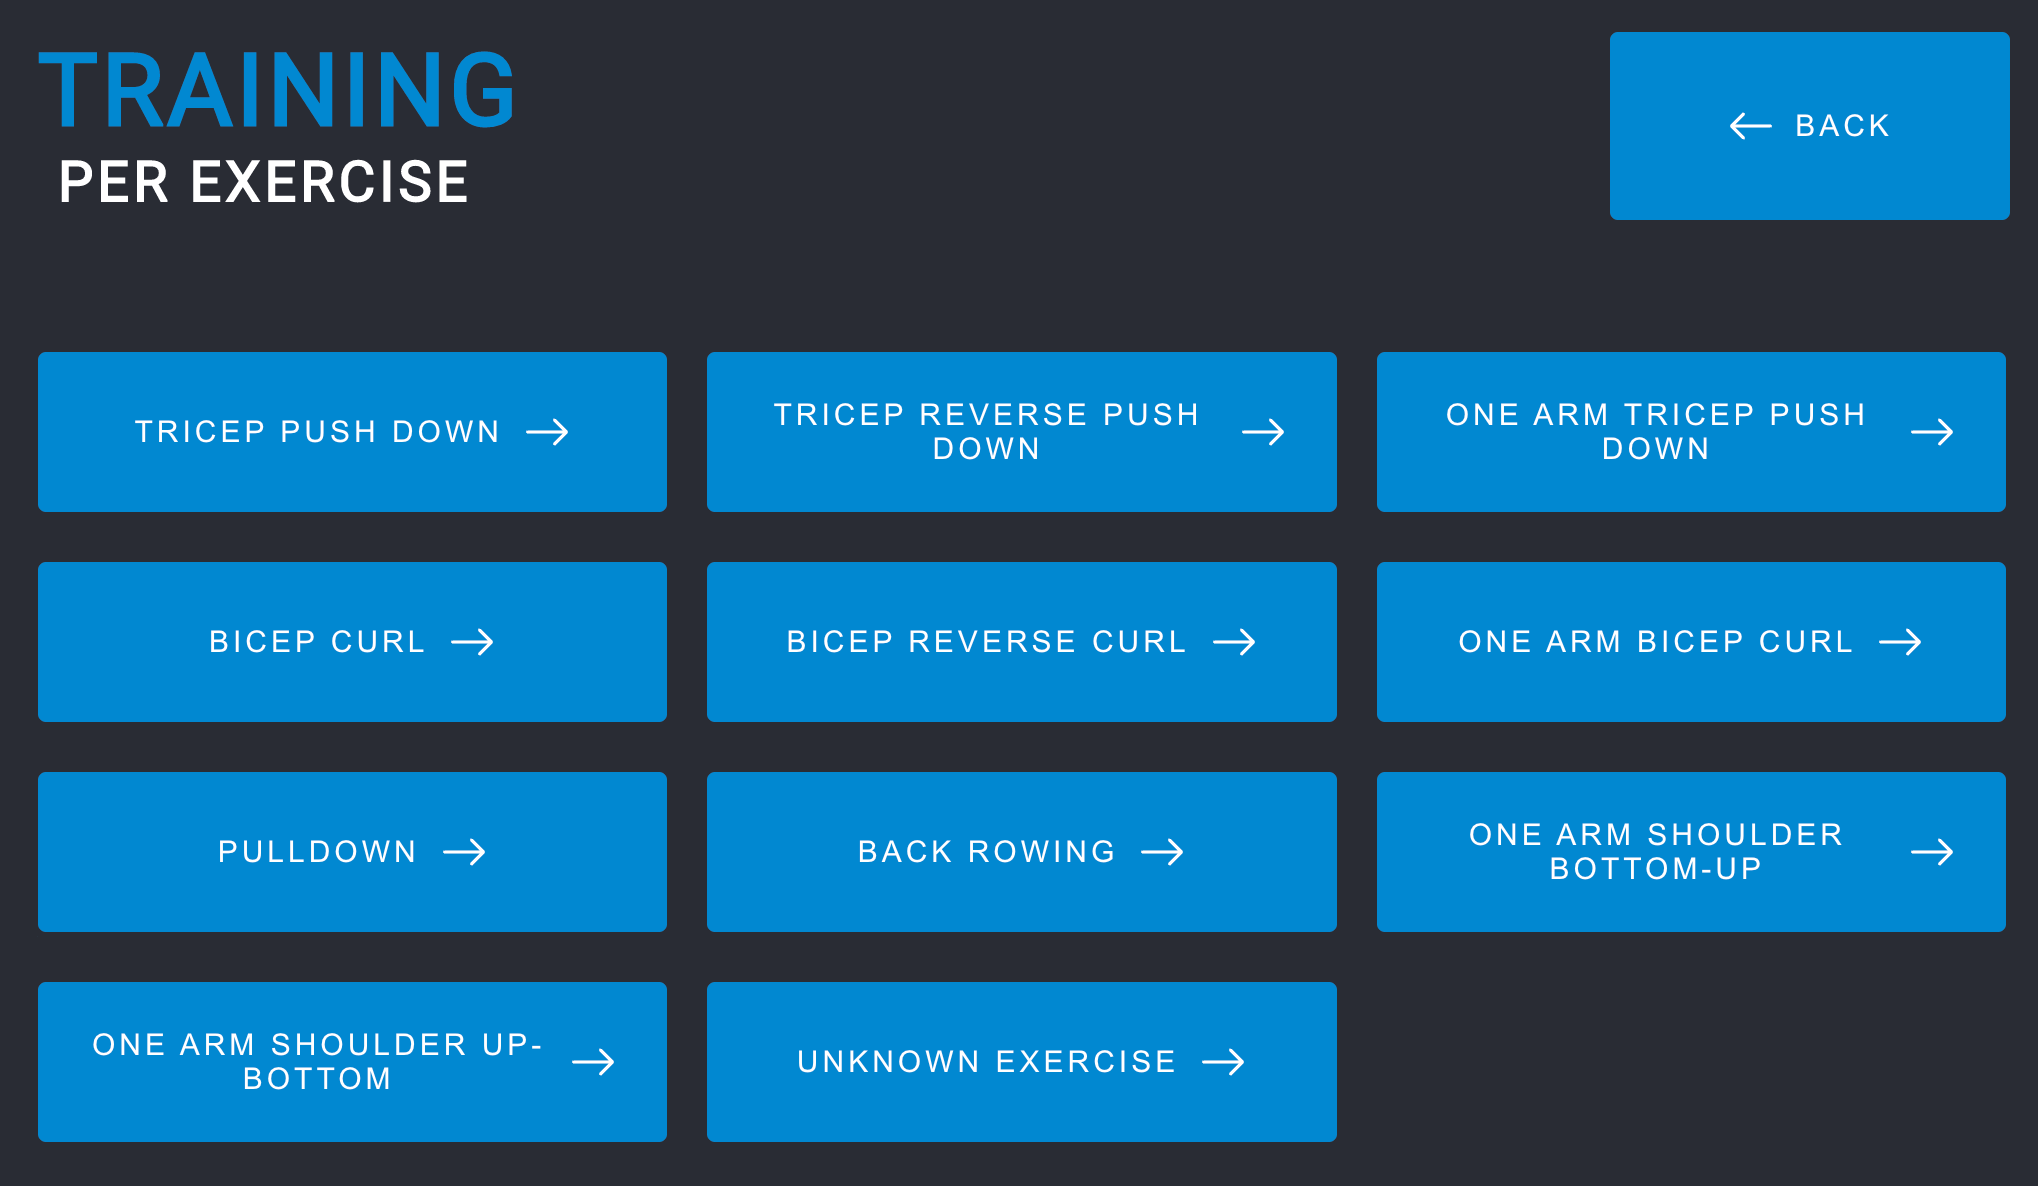
The mode is suitable if the user wants to do an exercise without selecting a workout which is the last mode. Once the weight is chosen, it creates a fake workout behind the scene, which allows sharing the code of the next screen with the previous feature: workout.
Workout
The last mode is the one I was looking forward the most: workout. You can create a whole workout on your computer, upload it to the server, select it, and get going with a minimal amount of configuration on the machine.
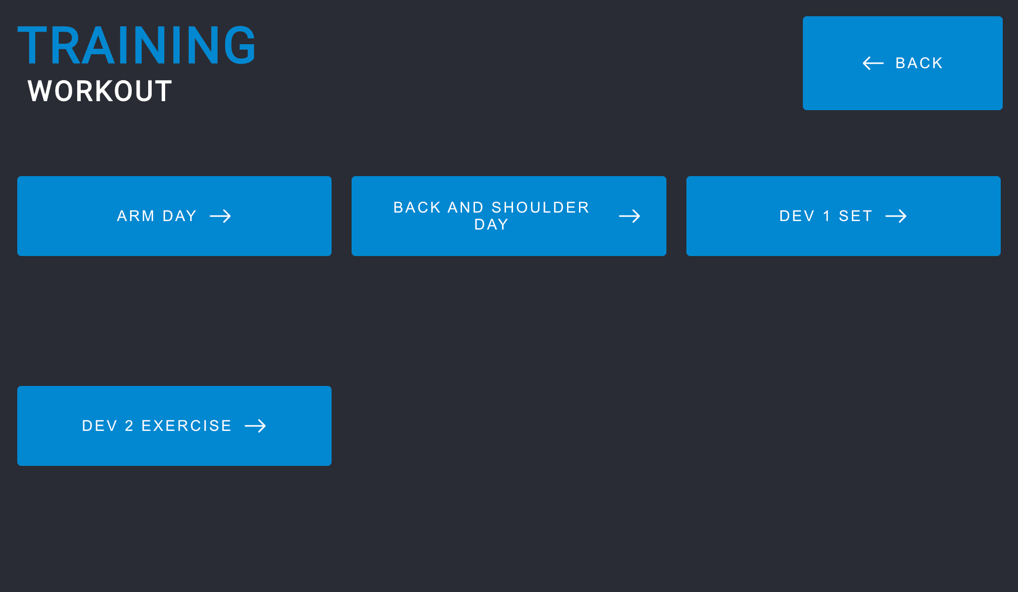
The beauty of the workout mode is once the specific workout is selected, the machine automatically adjusts the weight for the current exercise and set. There is nothing for the user to do.
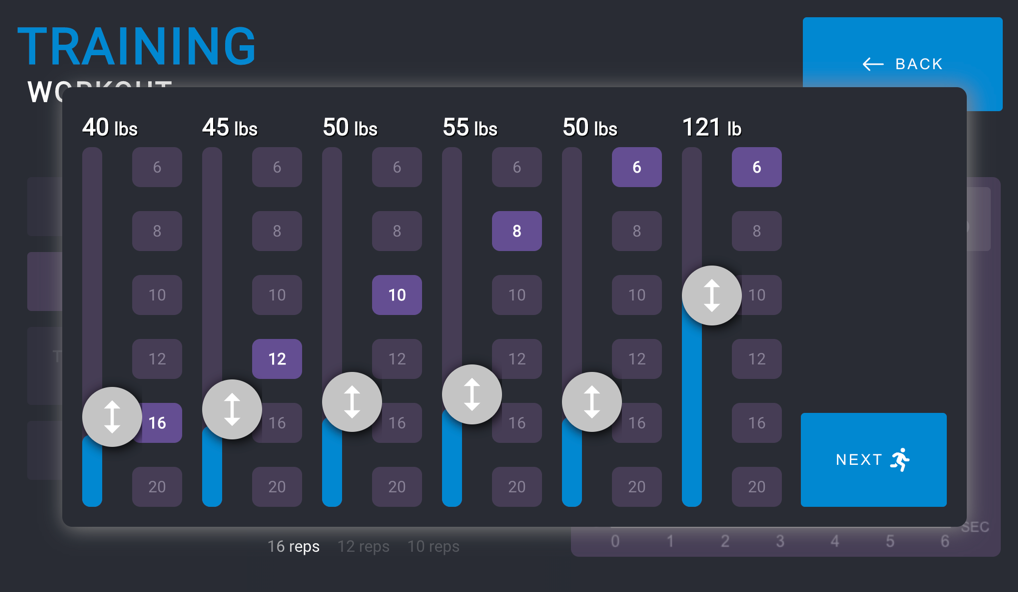
Once an exercise is completed, the system pops a screen allowing the user to adjust the weight optionally. Usually, I increase a few pounds every week, hence easy to do without relying on a computer or else.
The user interface is very responsive. For example, if the tank of water is filling, you will see in real-time on the screen that the water level is changing. The small video under this text also shows another feature: encouragement. If you are a keen observer, you can see that the user goes beyond the six repetitions excepted. The number of exact repetitions starts dancing! The video also shows that when the user drops the weight, the system automatically changes the water (weight).
Finally, once the workout is completed, we keep encouraging. I'm using the same principle of waves created from the custom weight adjustment that relies on primitive mathematic functions.
Building the hardware
The hardware was done with many iterations and led to the abandon of the project. The problem was not technically but financially. The project was evaluated initially to be around 400$ but it ended up to have projection of almost twice has that.
First iteration:
The breakdown of the cost (of the second iteration):
| Part | Quantity | Single Part Price | Total Price |
|---|---|---|---|
| Raspberry PI 4 | 1 | 40$ | 40$ |
| 7inches Touch Screen | 1 | 75$ | 75$ |
| Relay | 1 | 6$ | 6$ |
| Weight Sensors | 1 | 8$ | 8$ |
| Water Pump | 2 | 40$ | 80$ |
| Tote | 2 | 25$ | 50$ |
| 10ft x 1 tube | 1 | 25$ | 25$ |
| Tube Clamps | 4 | 2$ | 8$ |
| Pulley Block | 3 | 20$ | 60$ |
| Pad Eye Plates | 5 | 10$ | 50$ |
| Caster | 1 | 35$ | 35$ |
| Steel Wire Rope | 1 | 15$ | 15$ |
| Wood Structure | 5 | 15$ | 75$ |
| Plywood | 1 | 75$ | 75$ |
| Others | x | 20$ | 20$ |
| Total | 623+tax |
Explanation of the cost
Raspberry PI
The project contains two main parts. The web server host the static web application and the NodeJS server that communication with the sensors. The Raspberry PI hosts both software. Also, the Raspberry displays the web application on a monitor. Unfortunately, the price of the Raspberry PI is fluctuating quite a lot in the last few months, and it is hard accessing one device at the MSRP (Manufactured Suggested Retail Price).
Touch Screen
The project requires the user to interact via a touch screen. All inputs are performed directly on the web interface. The output is displayed on a screen with the expectation of 1024x600 pixel.
Water Pump
The project requires two water pumps. One pump to move the water from the tank that does not move and one to return the water back to the tank. To have something that reasonably transfers the water, I determined that I needed to use a pump around 1150GPH (4500L/H), which means that moving 50lbs would take 18 seconds if we assume that 50 pounds of water are 22.5 liters. Most of the time, between sets, we move about 5-15lbs; hence it would be about 2 seconds, but between exercises, we can foresee some more significant movement required.
Tube
To transfer the water fast with the water pump, we need the maximum diameter that the pump can support. The water pump specification says to reach the 4500L/H, we need to have 1 inch. The cost for 10 feet is surprisingly higher and not lower at any local shop.
Tote
The project needs two tanks of water. The container must be waterproof.
Pulley Block & Attachments
The pulley system is one of the areas where with the second iteration design, I was able to cut by limiting the amount of attachment and pulley. However, the second design remains unproven. Three packs of 2 pulleys for 60$ is too expensive as it also requires other attachments like carabiners, snaps hooks, eye hooks, and ceiling hook pad eyes. With the other attachment, the cost was moving toward 100$.
Wood
We need for this project five beams of 4x4x10feet and a sheet of plywood.
Others
I have not included the price of screws and tie plates to hold the structure together. Nor that I need some electronic wires and some wire clip clamp. There are small costs which would have probably added another 20$
Total
The total with tax approaches 700$. But that is if everything works on the first try. It might require some changes, mainly around the pulley system.
I also wanted to add springs which was an interesting search. Some interesting websites give you the exact specification you desire, but the cost is about 40$ for six springs. I couldn't find something that fitted the project locally. I also wanted some other features like painting the machine or additional sensors. Thus, I could see this project moving toward expensive.
Additionally, there is no gym attachment at that cost like a press down bar, a pulldown bar, or a tricep rope, which increases the price between 50 to 150$. So, as we can see, the project starts to have a tag price of about 800$.
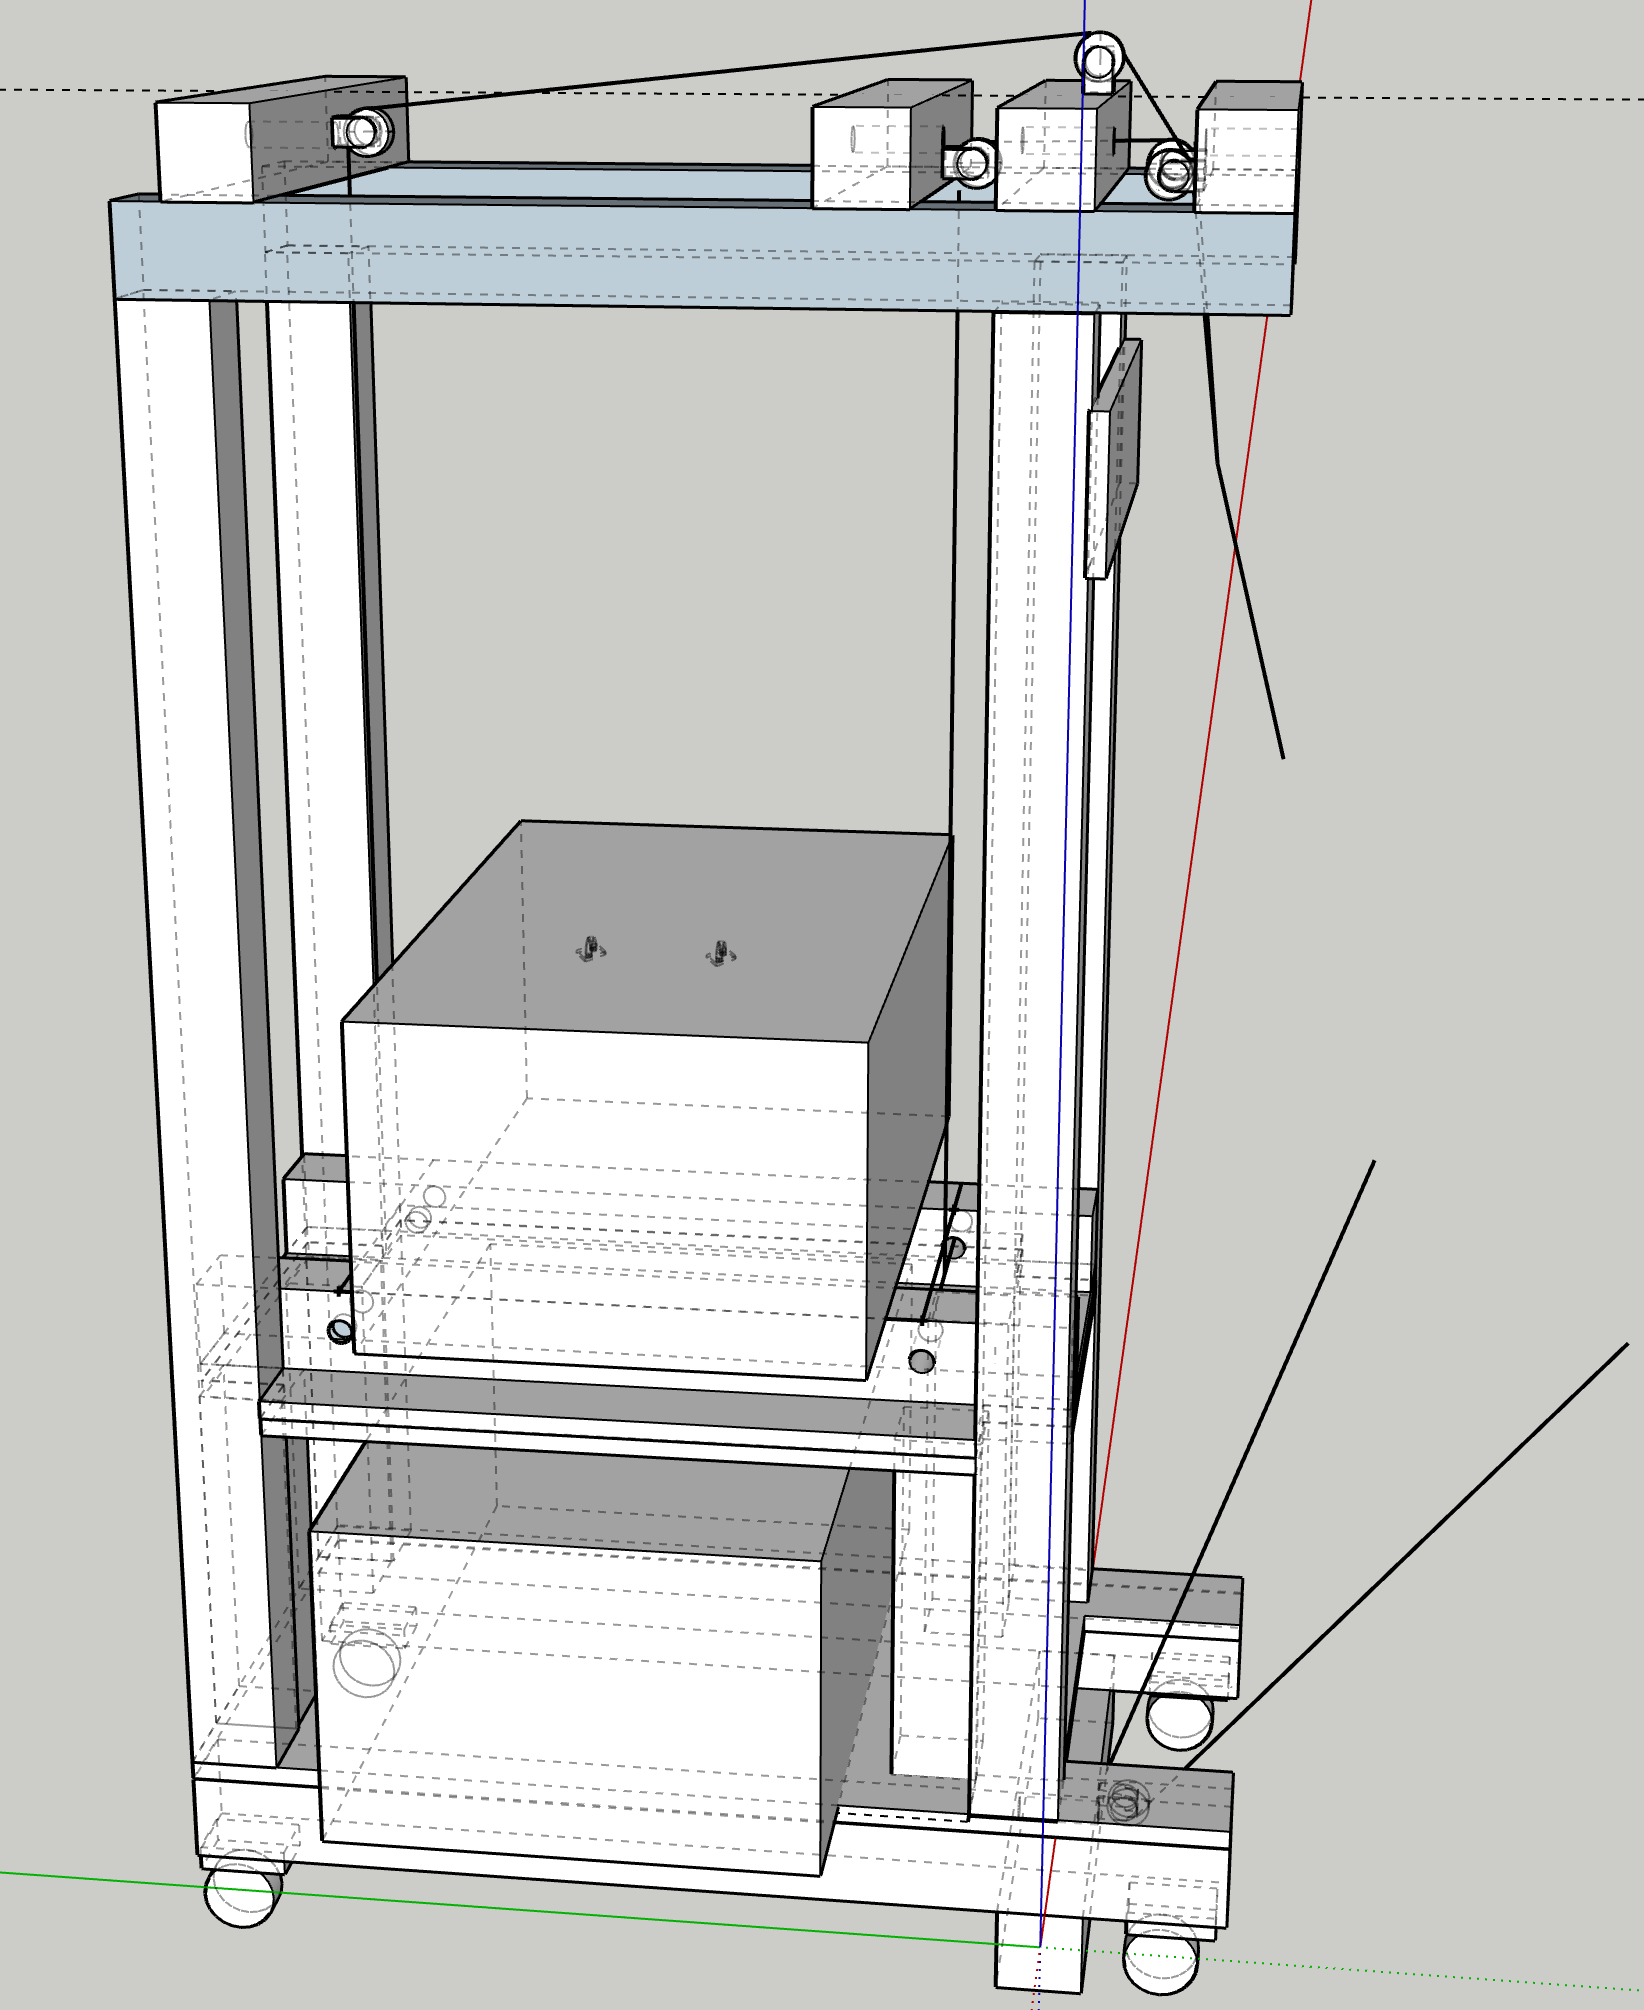
Here is the second iteration that has less wood, take less space and require less hardware (pulleys, attachments, etc)
Conclusion
I enjoyed creating the machine and might continue for fun here and there to improve the software. It was my first time using SolidJS, and I enjoyed the framework. I also liked to create custom animations for the weight selector based on real physical value.
Here is the last video showing the custom control with two shades of blue: one for the actual water and one for the desired water. When adjusting the weight, I created a fake wave showing some movement. We can also see the water shifting in color if we cross the threshold of actual water for better visibility.