
How to setup your Kanban Board for your Dev team in 5 minutes
Posted on: 2017-05-03
We are using VSTS at Microsoft Teams like many products at Microsoft. A few weeks ago, I decided to change our process of using the backlog as main view by using the Kanban board. As you may know, I worked for many years in VSTS and it feels so natural to have a quick glimpse of the Kanban board to know how everything is going. The reason is multiple but the main one is it was hard to figure out the state of each members. It was also hard to have a distinct view about what the front-end and the back-end team were working on. The last real benefit for me is that we do not need to waste time to evaluate every requirements and bugs, we just sort them in order of priority and blitz them through. In this post, I'll give you a short way to build a Kanban Board that work for developers.
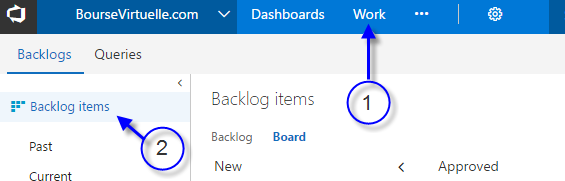
Starting with the Kanban board is not obvious. You need to go in your project, and click the "Work", then "Backlog". Then, you need to select the Backlog items on the left. There no indication of "Kanban" anywhere.
When you arrive there the first time, it's even more disconcerting. You will see 4 columns which is "New", "Approved", "Commited" and "Done". These are the default Kanban columns which doesn't mean anything if you do not that flow which is almost all the time. So, we need to configure the columns. Configuring the Kanban board is done by clicking the gear at the top-right of the board.

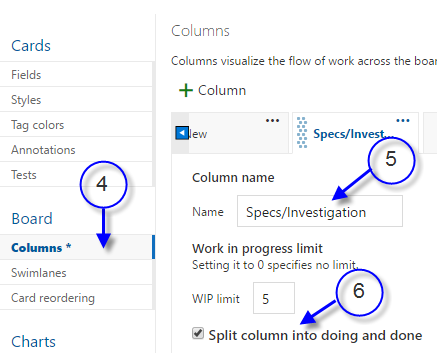
This dialog contains many options and they are not ordered especially in the order to create a new board. What you want to do is skip all the Cards options which you should define later. Click "Columns" under "Board" and let's change it into a flow that worked for me in the past as well as now. The first column to change is "Approved" for "Specs/Investigations". This column will be the first step and used by your project manager or by your engineering manager to specify which work is getting details about them. This is also good for bug which will get there to be in investigation before having a coded fix. This column is also having the special option "Split column into doing and done". This will result of having the column divided in two. The first part will be where someone commit working on it, and the other one is when the investigation or specification is written. This way, engineers knows that they can pick work from the column, not before. Having this column make it very clear when something is ready to pass to the next step and this is a must in teams that work fast and in an agile way. Anything in that column should be always pickup from top to bottom, whoever is available to grad new work.
The next columns are "Code", "Tests", "PullRequest", "Verification" and we keep "Done". The column code is when the developer is actually working on the code to build the requirement or fixing the bug. The column tests is when tests are created. Of course, unit tests can be written at the same time of your code, but this column ensure that additional integration code or even scenario tests are created. Sometime stuff doesn't move there for a long time but it still good to see if something get stuck for a long time or not. The pull request columns means that the code is ready to be looked by others. Finally, when the pull request is in the master branch, you can move the work in the verification column which mean that it should be verified that everything work as intended in the master branch. Once verified, which can be done by people that are not even developer since it's a verification that it works as intended. Once everything good, it goes in the Done.

Remember that bugs and requirement uses this board, so we must ensure that bug are manager with require the board to be setup this way. To change the behavior, in the board setting, go under "General" and "Working with bugs" and check "Bugs are managed with requirements".
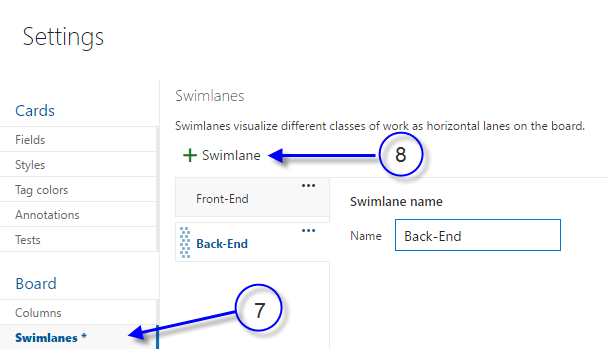
Next and last step is to separate the front-end and back-end work. This way, you can see what can block each others. This can be done by using the concept of swim lane. We will create one for the front and one for the back. This will divide the board in 2 vertically.
Of course, you can customize a lot more your board and VSTS is great to have coloring rules for example. However, within 5 minutes you can have your teams be up-and-running without doing too much.