
Trilium Note Taking with Mini-PC server host
Posted on: 2025-12-12
Why moving to Trilium Note
I have been using Microsoft OneNote since I joined Microsoft as a software engineer in 2014. I am paying Microsoft for storage as my notes increased largely when I did my Master's degree. I was uploading PDFs, annotating with a pen and taking note with a pen as well. However, I am slowly taking only notes by text as it becomes more efficient to use on my PC (not laptop). Once I completed my Master's, I was not uploading PDF anymore. But, I still continued taking daily note, personal note, general project notes, etc in Microsoft One Note. Until I joined Roblox few weeks ago.
For a while, I was looking to move to Obsidian, but the ecosystem seemed quite large, and the hosting solution wasn’t what I wanted. I also wanted something that has not too many features, with a focus on quickly taking note and not tweaking indefinitely. Then, I found a middle ground: easy to install, easy to host if needed, and usable on my mobile phone.
Trilium Note
Trilium is a simple install and focuses on daily notes. You can save folders and notes in HTML. The syntax is quite easy, there is a small toolbar and it saves everything in a SQLite database. I have one instance that I back up weekly backup to a private Git Repository; otherwise, it stays local. At my house, I started migrating the relevant information slowly to a local version as well. I started with a backup to one of my external hard drive but then I realised that I could host on my Mini-PC that I use as a server for a Discord bot to host a server which synchronises my note between my computer and the server. This solution brings my note to my mobile phone. However, it requires some network configuration to access the Mini-PC from my local network at home, everywhere around the world, for my mobile. To do it securely, there are many ways and in this post, I will explain how I use a private VPN.
Network Architecture
The network architecture, before doing anything, looks like the following:
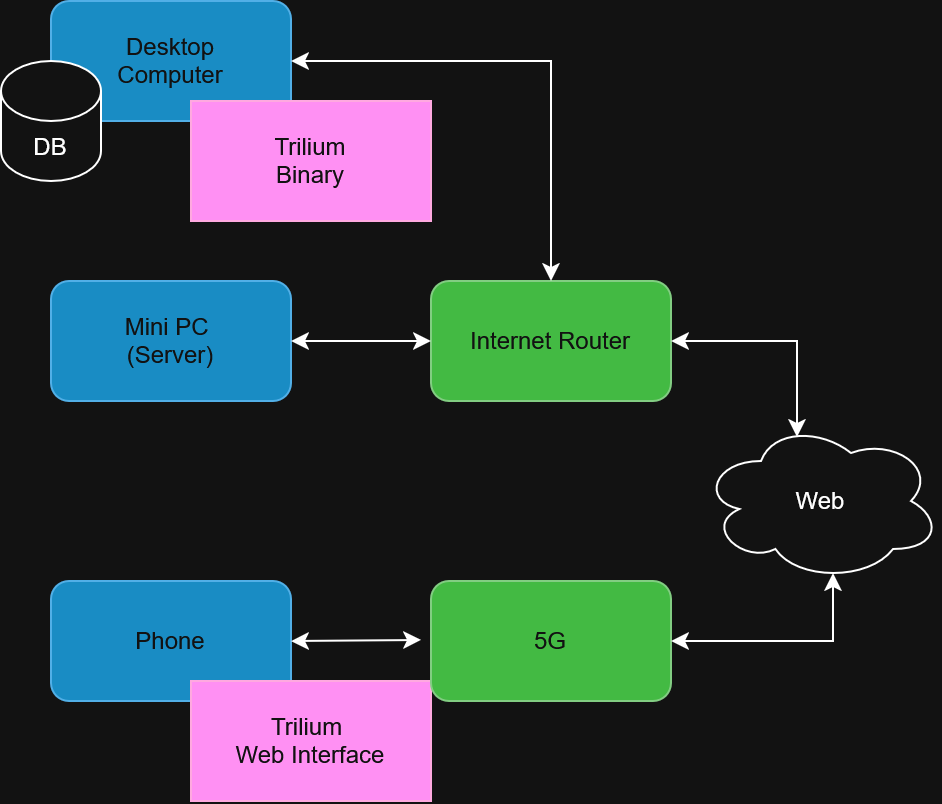
The computer uses a binary version of SQLite in the hard drive of the desktop. The computer has a conventional connection to the Internet using a normal router. In my case, I have an Xfinity router. The Mini-PC runs Ubuntu Server with a direct Ethernet connection to the same router. My phone can connect to a 5G network, but also to any Wi-Fi networks from any place (private or public).
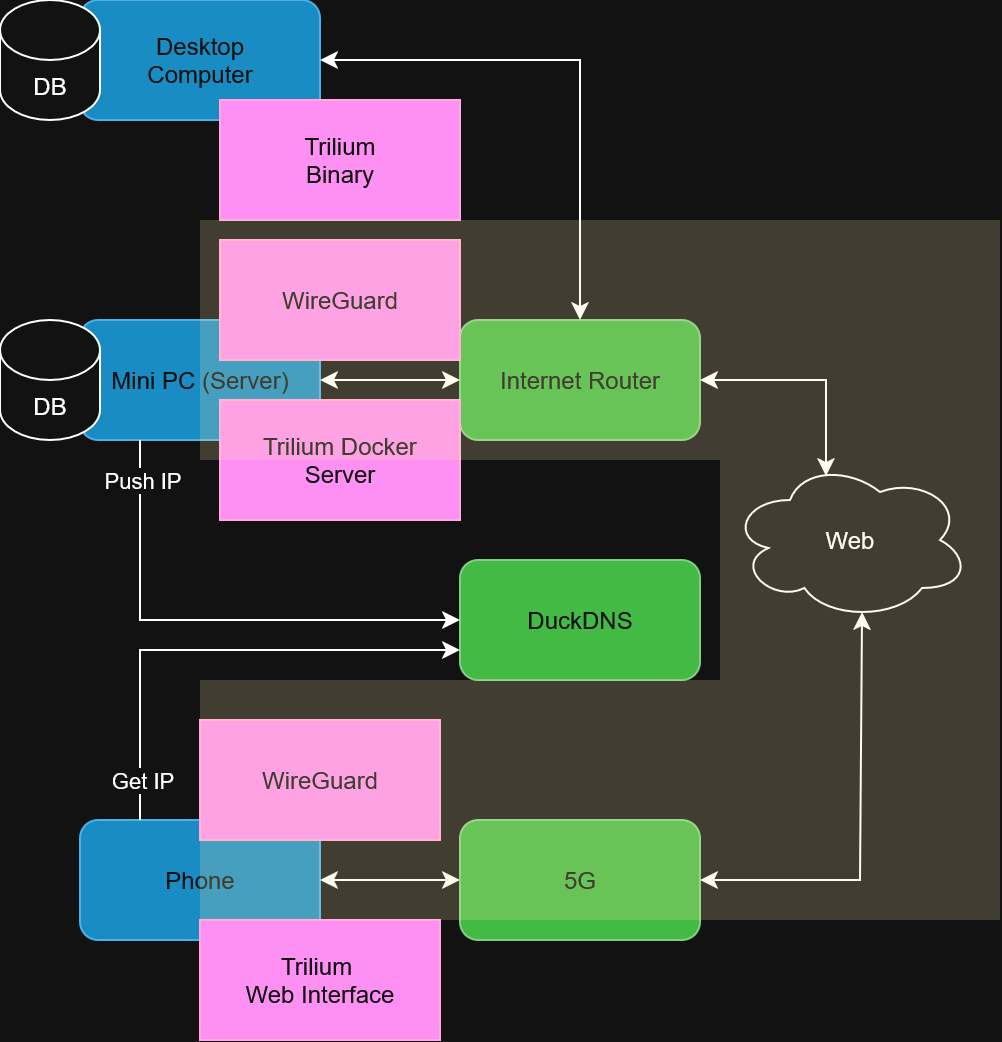
The final architecture diagram contains the Trilium Docker server, which hosts the synchronisation server and the web interface. The architecture contains a large yellow band that is a private VPN. All the notes will only be accessible once authenticated via an encrypted tunnel. That tunnel requires authentication using WireGuard VPN (free). The new architecture allows synchronising local Trilium to the server, allowing the phone to connect to the data.
Configuration Steps
The first step is setting up with Duck DNS (or any DNS server) a way to keep my home IP available from my phone. The IP change once in a while and a trick is having a cron job sending the IP from the Mini-PC. The setup is straightforward:
- Create a free account on https://www.duckdns.org/
- Copy the unique secret key that allows sending an HTTP request to update the IP
- Install a cron job that sends the IP periodically.
#!/bin/bash
echo url="https://www.duckdns.org/update?domains=<REVOKED>&token=<REVOKED>&ip=" | curl -k -o ~/duckdns/duck.log -K -
chmod +x duck.sh
(crontab -l ; echo "*/5 * * * * ~/duckdns/duck.sh >/dev/null 2>&1") | crontab -
The second phase is setting up the Trilium server with Docker.
sudo apt update
sudo apt install -y ca-certificates curl gnupg lsb-release
sudo mkdir -p /etc/apt/keyrings
curl -fsSL https://download.docker.com/linux/ubuntu/gpg | sudo gpg --dearmor -o /etc/apt/keyrings/docker.gpg
echo "deb [arch=$(dpkg --print-architecture) signed-by=/etc/apt/keyrings/docker.gpg] \
https://download.docker.com/linux/ubuntu $(lsb_release -cs) stable" \
| sudo tee /etc/apt/sources.list.d/docker.list
sudo apt update
sudo apt install -y docker-ce docker-compose-plugin
mkdir -p ~/trilium/data
cd ~/trilium
Docker configuration:
version: "3.8"
services:
  trilium:
    image: zadam/trilium:latest
    restart: unless-stopped
    ports:
      - "0.0.0.0:8080:8080"   # accessible only inside LAN (not exposed to Internet)
    volumes:
      - ./data:/root/trilium-data
Start the Docker:
docker compose up -d
The third phase is setting the secure virtual private network (VPN). It requires installing on the Mini-PC WireGuard, which open a new network interface that allows a specific peer to connect. In our case, the WireGuard client will have a secure key that the server can decrypt using a private and public key pair.
On the server:
sudo apt update
sudo apt install -y wireguard qrencode
cd /etc/wireguard
sudo wg genkey | sudo tee server_private.key | sudo wg pubkey | sudo tee server_public.key
# Keep these in mind to copy in the conf file
sudo cat server_private.key
sudo cat server_public.key

sudo mkdir -p /etc/wireguard
sudo nano /etc/wireguard/wg0.conf
Then client keys:
wg genkey | tee ~/client_private.key | wg pubkey > ~/client_public.key
The configuration will depend on your setup, but it should be roughly similar to this. Use the private and public key from the previous step.
[Interface]
Address = 10.66.66.1/24
ListenPort = 51820
PrivateKey = <REDACTED>

# NAT + forwarding
PostUp = sysctl -w net.ipv4.ip_forward=1; iptables -A INPUT -i wg0 -j ACCEPT; iptables -A FORWARD -i wg0 -j ACCEPT; iptables -A FORWARD -o wg0 -j ACCEPT; iptables -t nat -A POSTROUTING -o enp1>
PostDown = iptables -D INPUT -i wg0 -j ACCEPT; iptables -D FORWARD -i wg0 -j ACCEPT; iptables -D FORWARD -o wg0 -j ACCEPT; iptables -t nat -D POSTROUTING -o enp1s0 -j MASQUERADE

[Peer]
PublicKey = <REDACTED>
AllowedIPs = 10.66.66.2/32,10.66.66.1/32
Enable IP forwarding and UFW firewall access to the UDP protocol on port 51820. The port is chosen for WireGuard to communicate.
sudo sysctl -w net.ipv4.ip_forward=1

sudo ufw allow 51820/udp
sudo ufw allow in on wg0
sudo ufw reload
Add the peer section in the WireGuard server. The peer configuration is the secure way to allow a specific client, like my phone.
nano /etc/wireguard/wg0.conf
The interface part remains the same, but the peer is new and contains the PublicKey that is from the wg genkey.
[Interface]
Address = 10.66.66.1/24
ListenPort = 51820
PrivateKey = <REDACTED>

# NAT + forwarding
PostUp = sysctl -w net.ipv4.ip_forward=1; iptables -A INPUT -i wg0 -j ACCEPT; iptables -A FORWARD -i wg0 -j ACCEPT; iptables -A FORWARD -o wg0 -j ACCEPT; iptables -t nat -A POSTROUTING -o enp1>
PostDown = iptables -D INPUT -i wg0 -j ACCEPT; iptables -D FORWARD -i wg0 -j ACCEPT; iptables -D FORWARD -o wg0 -j ACCEPT; iptables -t nat -D POSTROUTING -o enp1s0 -j MASQUERADE

[Peer]
PublicKey = <REDACTED>
AllowedIPs = 10.66.66.2/32
AllowedIPs = 10.66.66.2/32 means only the peer (client, the mobile) needs routing.
The next step is to configure the WireGuard mobile app. There is an easy way to generate a QR code that will move all the configuration to the phone:
Phone:
[Interface]
PrivateKey = <client_private_key>
Address = 10.66.66.2/32
DNS = 1.1.1.1

[Peer]
PublicKey = <server_public_key>
Endpoint = <REDACTED>.duckdns.org:51820
AllowedIPs = 0.0.0.0/0
PersistentKeepalive = 25
The 10.66.66.1 is the IP we will use in the phone browser to access the Trilium web interface via the VPN. In Chrome, going to http://10.66.66.1:8080 goes to the Trilium web interface hosted by the Mini-PC. Port 8080 is the one open in the Mini-PC via Docker.
Internet Router
The last step is critical: You must go to the router, most likely in the advanced setting and open for the Mini-PC the port 51820 for UDP connection.
Understanding the Configuration
The ip 10.66.66.1 is the Mini-PC IP in the virtual private network (VPN). The 10.66.66.2 is the IP of the client (phone) in the VPN.
Here is a visual:
[Phone wg0: 10.66.66.2] <--encrypted--> [wg0 on Mini-PC: 10.66.66.1] --> [Docker: 10.0.0.181:8080]
The client configuration of 1.1.1.1 means the phone uses the Cloudflare DNS for any DNS resolving URL.
The endpoint <REDACTED>.duckdns.org:51820 is to find the IP to establish a connection with WireGuard to the Mini-PC.
The AllowedIPs = 0.0.0.0/0 means that once the VPN is on, all the traffic goes to the VPN.
In short, it means the traffic goes from the mobile to outside:
Phone → WireGuard Tunnel → Mini-PC → Trilium (if port 8080)
Internet traffic (not Trilium)
Phone → WireGuard tunnel → Mini-PC → Internet → Cloudflare
Cloudflare → Internet → Mini-PC → WireGuard tunnel → Phone
Using AllowedIPs = 10.66.66.1/32 tunnels only traffic destined to the Trilium server’s VPN IP. WireGuard routes by IP address, not by application or port, so this works because Trilium is accessed exclusively via 10.66.66.1. Also, if we do so, we might want to remove the DNS entry, avoiding DNS resolution to go through the tunnel.
Conclusion
Once WireGuard is enabled on the phone, all traffic is encrypted and sent through a tunnel to the Mini-PC. The Mini-PC acts as the VPN endpoint and routes traffic either to the Trilium server locally or out to the Internet.
The Internet is only used as a transport layer for encrypted packets; trafficdoes not exit the tunnel until it reaches the Mini-PC. Trilium is not reachable from the Internet without the VPN. We have now safe notes, that have backup on the Mini-PC and fast access on the desktop!